Brother Scan N Cut

Tools available on my blog

Monday, February 28, 2011

Puppy love with the Chomas Creations mini gel pen holder & something special drawn by ME!!!

Awhile back I got a Wacom tablet, and I did draw some things with it, and I'm having fun with it, but I could never think of designs that I could do.  Until now hehe!  These journaling doodle scallop circles are hand drawn by ME!!!  I think they turned out super cute!  And because I love you all, I'm sharing them for Make-the-Cut here... doodle scallop journal circles
The file has a draw layer and a shadow layer, so after you draw the circles with your Chomas Creations mini gel pen holder, you can then turn on the shadow layer & cut around them!

How cute are those??? 
Here is my journaling on my page using one of the journaling circles.

Next I had to work on a title!  The puppy love is from Lettering Delights!  They have SVG's you can now download for very reasonable prices.  And of course SVG's work great with Make-the-Cut!  So I drew the puppy love with the Chomas Creations mini gel pen holder.  I also added my doodle circle around it and then colored it all in with Copic markers.  I had a little whooopsie with the hearts, but no fear!  Whooopsies are easy to fix (sometimes hehe).  I simply cut a few more hearts, colored them with the Copics and layered them on top of my other hearts to hide the mistakes!
 
Of course no animal of mine would be complete without googly eyes!!! Being my dog has some big eyes for his little body, I thought some HUGE googly eyes would be perfect hehe!
The paper line I used for this page was Basic Grey's Olivia line.  I like to keep my pages easy to put together, so I love matching paper lines that make it easy to use different patterns of paper together.  Here are 2 of my kids with our new puppy!

We adopted Bugsy (he came with the name) from a local animal rescue group.  He is a 1 year old chihuahua and I just fell in love with him the minute I saw him!  Wasnt' planning on getting a dog that day, but hey, things happen hehe!
Here is a little extra something as well!  Each time I draw something cute like the puppy love my kids see it and want one!  So instead of just drawing 1, I copy and paste them and draw a few, so my little helpers can color to (not with my Copics though!!! Those I'm not sharing hehe!)

My 4 year old had fun with that one!
Also coming soon, I'll be sharing an oval doodle journaling shape with you!!!


Like what you see? Leave a comment to let me know!

Sunday, February 27, 2011

Frost layout with Chomas Creations engraving tip for Custom Crops

I made this Frosty Layout for Custom Crops using the Chomas Creations engraving tip.  If you would like the free download, more close ups and complete instructions you can go here... Frosty Layout


Like what you see? Leave a comment to let me know!

Friday, February 25, 2011

Polymer clay and the Chomas Creations engraving tip!

So I get this email from Nichole, lil' star, wanting to show me what she did with baked polymer clay and the Chomas Creations engraving tip!  I just love when people share what they have been up to with the Chomas Creations products because while I try to think of everything, I just can't!  And look how cool this turned out, I never would have thought to try it, thanks sooo much for sharing Nichole!

These are the directions Nichole gave me about how she did this barette!
The polymer clay was about 1/8th an inch thick after baking. I use

Sure Cuts A Lot, but I'm sure it would work in Cricut Design Center
just the same. The designs on the barrette are standard shapes that
come with the latest version of Sure Cuts A Lot under the Swirls
category. The image was engraved about 6 times before unloading it.
There was some powdery residue that was easily removed by putting
clear tape over it and then removing it. The residue stuck to the
tape.
I used a low tack double stick tape under the clay to better adhere it
to the mat. I positioned the clay close to the corner nearest the
blade so I could see that the blade was in position to clear the clay
and engrave the image.
I think it is very cool that you have created these Cricut compatible
products and enjoy being able to purchase from the inventor of the
product.
Thanks,
...Nichole


Like what you see? Leave a comment to let me know!

Thursday, February 24, 2011

You make life with Chomas Creations mini gel pen holder, embossing kit and Make-the-Cut

I realllly love using journaling strips on my pages!  Especially if I don't want to hide a lot of my background paper, or in this case the embossed circles behind a big journaling box.  But usually I print them out, then have to cut them all by hand into strips.  I figured out an easier way! 
You can type a lot of text in Make-the-Cut which makes doing this super easy!  I typed the text on the draw layer of my file, then I used the Chomas Creations mini gel pen holder to draw all of the text on my paper.

Then I used the shape tool to add rectangles that I want to cut onto my journaling.  To keep them all the same height, I copied them and pasted them in place and just adjusted the length for each one.  I then copied the boxes and added them to the cut page of my file.  Without removing the mat from the Cricut, you change the mini gel pen out for the blade and then cut the cut page.

I then had journaling strips that were ready to go on the page!  For this file, which would work for any kid's page, you can download the file for Make-the-Cut here... journaling strips
Here are the strips all done!


I also used the Chomas Creations embossing kit to do the circles on my page, and you can download that pattern for Make-the-Cut here... circle embossed design

The title is also on the download for the journaling strips as well as the circle that is layered.  The inside circles are drawn with the Chomas Creations mini gel pen holder as well.

Here is the page all done, with my nut of a son!  He sure does make my life quite interesting hehe!

Like what you see? Leave a comment to let me know!

Wednesday, February 23, 2011

Framed mirror with the Chomas Creations engraving tip and Maria!

Maria from Believe Dream Create did this awesome framed mirror with the Chomas Creations engraving tip!  These are her directions, and if you just love it like I do, head to her blog and let her know! 

Engraving with the Chomas Creations Engraving Tip


I had another idea with the Chomas Creations Engraving Tip and a Mirror. I created this Home Decor Frame with only the Cricut, Gypsy, Chomas Creations Engraving Tip, one piece of craft mirror, one piece of 12 x 12 patterned paper and a store bought frame. In person, this project is just BEAUTIFUL! But....with a mirror, it is VERY difficult to photograph (please excuse my reflection). After taking 50 photos or so, I finally gave up and these are the best.


I made the file in my Gypsy. This took the longest part. I welded the border together from an image on the French Manor cartridge. Each little square (.76 inches) is welded to the next. Time consuming, YES, but the results are SO worth it! I then used Winter Woodland to write the words McGuire (1.37 inches) and est. 1987 (1.14 inches). I used both the shadow and the main image of the letters to really get the engraving tip into action! Here is a close-up of the Gypsy screen.

Below is a picture of what it looked like after I took it out of the Cricut. I didn't use multi-cut. One pass through was enough to give it a beautiful engraved finish.


Seriously, all I did after this was cut away some of the excess mirror with my heavy duty trimmer, tape it onto a piece of patterned paper cut to size and put it in the frame. This has got to be the easiest home decor project I have EVER made! Probably one of the most beautiful too :) This would be the best gift giving item....as a matter of fact, some family members I have might be seeing one of these in the future...but this one is mine! Now keep in mind I said easiest....you will have to take a little time to do something like this in the Gypsy with all the welding and lining up, and it takes a good 20 minutes or so for the Cricut to finish engraving all this, but you can always walk away and come back to a piece of artwork! I said it before and I'll say it again, you NEED this Engraving Tip!!

Thanks sooooo much Maria!  Have I told you lately that YOU ROCK???
Like what you see? Leave a comment to let me know!

Friday, February 18, 2011

Little Miss Sunshine with Chomas Creations mini gel pen holder for the Silhouette and Copics

When I saw the new files for the Little Miss and Little Mr. for the Silhouette, they reminded me of being a kid again, and I had to have them!  Only problem was there are some tiny cuts on there!  Bring on the Chomas Creations mini gel pen holder for the Silhouette!!!  Instead of cutting Little Miss Sunshine, I added all of her layers together in Silhouette Studio, then I drew her with the Chomas Creations mini gel pen holder for the Silhouette and the black metallic mini gel pen. 
I then colored her in with the Copic markers!


Sometimes I type my journaling in Microsoft Word, then have to cut all the strips with my journaling, which can be quite time consuming, so I decided to try it with Silhouette Studio instead.  It was quick to type my journaling in Studio, which I then drew onto cardstock with the Chomas Creations mini gel pen holder for the Silhouette.


Then I added little rectangles around the journaling lines, and copied and pasted those onto another layer in Studio.  I then cut these.

My journaling boxes were done!!!  I added a little yellow Copic around the boxes before I added them to the page.


I also cut the sunshine and clouds out with Silhouette Studio.  This was actually a pretty quick page for me!  I added some Stickles around my clouds and sunshine!  Voila!


Like what you see? Leave a comment to let me know!

Thursday, February 17, 2011

Sweet heart layout with Chomas Creations engraving tip

Ooooh I had fun with this one!!!  I had seen the string of hearts sewed onto a page in another layout and just had to give it a shot!  The hearts are from Simply Charmed, I hid the inside of the hearts in Design Studio, cut them and then inked the edges.  I added them to the page with a little bit of glue on the bottom of each heart, so that when I sewed them on the needle on my sewing machine wouldn't get all stickied up.  For the ribbon I used Zip Dry glue, my new fav for ribbon!  I'm already on my 2nd bottle hehe!
For the circles on the page, I made a file in Design Studio with Simply Charmed then used the Chomas Creations engraving tip to engrave the hearts onto Core'dinations cardstock!  Just a little bit of sanding makes them really pop and then I roughed up the edges of the circles a bit to. 


This is me with my niece a few years ago, she is now a busy 3 year old!  I just couldn't get enough snuggles from her!

Like what you see? Leave a comment to let me know!

Wednesday, February 16, 2011

Love Bug layout with Chomas Creations mini gel pen holder & Copics!

Coloring with the Copic markers takes me back to my child hood!  Sometimes I could just sit and color for hours!  So this was a really fun one for me to do! Of course I wasn't exactly coloring for hours lol!
I started by designing this love bug file with Simply Charmed in Design Studio, you can download the file here... Love bug file
Then I used the Chomas Creations mini gel pen holder with the black metallic mini gel pen to draw the bugs and title on my page.  I then replaced the mini gel pen holder with the blade carefully, and cut the hearts around them.  I do like to let my images dry just a bit before I start coloring.  I used the Copic markers to color in the bugs and hearts, no smearing!  Then I used an ink pad to age the edges of the hearts a bit.  Of course no buggy is complete without googly eyes!


I added one of my journaling circles to the page that I did with the Chomas Creations mini gel pen holder, you can get the file and instructions for that here... journaling circles

Here is my completed page with my love bug all decked out for Valentine's Day in loads of PINK!  hehe


Like what you see? Leave a comment to let me know!

Monday, February 14, 2011

You rock with Chomas Creations embossing kit

My son is one amazing kid!  He is almost 13 and he has to be the most easy going, laid back, sweet kid I've ever met!  He still likes hugs from his mom, and you can't embarrass him for nothing!  He still dances in the car with me when a good song comes on, and we have a great time embarrassing his older sister!
So he rocks!  Look how the Hannah Montana cartridge can work for boys!  The guitar, the "you" and the "rock" are all from it! 
I used the Chomas Creations embossing kit to emboss with the Cricut on a piece of Ten Seconds Studio metal sheet.  To do this I placed it black side down on the embossing mat, then sanded off the raised guitar and square area. 


I cut the you and rock out of some silver sheets I found at Target in there $.99 spot of scrapbooking, 2 sheets!  And it is really shiny!  I used multicut of 2 as it is a bit thick. 

Like what you see? Leave a comment to let me know!

Saturday, February 12, 2011

Simple thinking of you card with Chomas Creations mini gel pen holder and embossing kit

Sometimes you need a quick card!  And wow, was this one quick, yet it turned out so cute!  I have ready to go cards that are scored and come with matching envelopes, and I put this one on my mat and drew the thinking of you with the Cricut and the Stamping cartridge.  I then colored it in with a Copic marker.
Then I took a piece of the Ten Seconds Studios periwinkle metal sheets onto the Chomas Creations embossing mat colored side down and embossed it.  I left the image unsanded for my card, but I embossed 2 of the images so I would have an extra, and show that one sanded.
Super quick and easy!  Not everything in life needs to be complicated!


Like what you see? Leave a comment to let me know!

Thursday, February 10, 2011

Quick and fun Valentines with the Chomas Creations mini gel pen holder and MTC

Being I have an abundance of cardstock, patterned paper, and fun stuff to play with, we make our own Valentine's Day cards in this house!  I made a design with Make-the-Cut to draw the Valentine's cards with the Chomas Creations mini gel pen holder, then cut around them.  I have the Make-the-Cut file for download here...  Valentine's download

You  may need to click on the image to enlarge. 
1.  This shows you are on the draw cut page in MTC
2. On the default layer, click on the eye to close it
3. On the shadow layer make sure the eye is open
Now your images are ready to cut.  Use your blade to cut these hearts out

4. On the default layer click on the eye to open it
5. On the shadow layer click on the eye to close it
Now your images are ready to draw.  Without moving the blade carraige, gently remove the blade and replace it with your choice of color mini gel pen and the Chomas Creations mini gel pen holder.  Draw your images. 

Here is what the hearts look like after they have been cut and then drawn.

I also made a mirror layer in MTC, because I'm going to add the heart to the backs of the kids cards so they are not all white. 

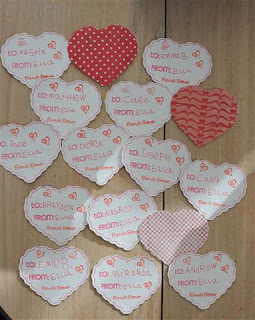
Now when the kids get home from school they can glue them together, write their friends' names on the cards, and also stamp hearts, XOXO's and whatever other stamps we can come up with! 

And here is what my kidlets came up with!  My 4 year old did most of the stamping hehe!  We used Samantha's Artsy Heartsy stamp set, you can see it here... Artsy Heartsy  Jack loved how he could put the hearts patterns inside the hearts and kept asking me... "isn't it just beautiful?"  Kids!  hehe


Like what you see? Leave a comment to let me know!