Brother Scan N Cut

Tools available on my blog

Friday, December 18, 2015

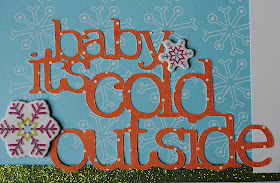
Baby it's cold outside with Chomas Creations adjustable pen holder for the Cricut

Wooohoo! Moving onto cold weather layouts, finally!  This was last winter and I just love these rosy cheeks with snow melting on my son! 
I used the Chomas Creations adjustable pen holder with a WHITE gel pen in the Cricut Expression2.  I drew the snowflake background with Doodletype.


I also used Doodletype to design the baby it's cold outside title.


I used the Chomas Creations adjustable pen holder to draw the journaling circle.  These were some I had on hand as I have a lot of them lying around and make a bunch at a time.

I used some chipboard stickers by Imaginesce to finish this page, as well as some glittery ribbon!


Like what you see? Leave a comment to let me know!

Sunday, December 13, 2015

Christmas tags with Chomas Creations adjustable marker holder

This is one of my favorite things to do every year with the Chomas Creations holders!  Make my own Christmas tags!  You can do a whole page at a time, this has 24 tags on it!  You can get the Christmas tags file for Silhouette Studio here... tag file

Well now, how about a tutorial on making your own tags?
I added a 12x12 sheet of paper to the Silhouette mat.  Then I added the Signo Uniball white gel pen to the Chomas Creations adjustable marker holder

Now in Silhouette Studio I clicked on the outside of the design (1), this highlights all of the tag shapes.  Then click on the cutline settings icon (2) and turn off the cutlines by clicking no cut (3).  Now you can draw all of the snowflakes and the to and from.  The to and from are a Lettering Delights thin font.  The Signo Uniball gel pen needs a bit of drying time so I set my speed to 1 and my thickness to 5.


Now we need to cut the tags.  In Studio again click on the outside of the tags (1) and click on cut (2). 
Now we need to turn off the snowflakes so they don't cut.  Click close to one of the "m" in from to highlight all of the snowflake pattern (1) and click on no cut (2).  Now you can replace the adjustable marker holder with the blade and cut the design.
Now your tags are all done!  I used the white but you can use any color for these!  And you can always use the Chomas Creations adjustable pen holder with most gel pens to center them and use this design.  I did take a few seconds to fill in the to and from words with white gel pen so they would look solid.


Like what you see? Leave a comment to let me know!

Wednesday, November 25, 2015

Clear cardstock card with the Chomas Creations marker holder! And a big sale!!!!


I just can't get enough of the clear cardstock, and there are sooo many ideas rolling around inside my head!  I started by "drawing" the snowflakes with the Chomas Creations marker holder and an ultra fine Sharpie in the Cricut.   I got this clear cardstock to give a try from Papertrey Ink.
I have this flocked vinyl from Silhouette that I used to do the snowy hills and the snowmen, and the snow on top of the trees, it cuts easily with the Cricut. The hills I just hand cut with an exacto knife.  The snowmen are on the front of the card, and the trees are on the inside of the card!


Of course no snowman is complete without googly eyes!!! 


Like what you see? Leave a comment to let me know!

Wednesday, November 11, 2015

Chief layout with Chomas Creations adjustable pen holder for the Silhouette/Cameo

My Gramps is an amazing man.  He has some amazing pictures from serving in World War II as well as a very sharp memory that he can give you dates, locations and such.  I wanted to honor him in a special page for Veteran's Day, and here it is!    My Gramps was honorably discharged from the army in 1944 when he was hit in the leg with shrapnel in Germany.  He went to a veteran's lunch last week, and people were amazed that this 96 year old man was there.  My Gramps is an amazing man, like no one you've ever met before, so kind hearted, easy going, and he never complains!  I love that man!
A special thanks to all of our veterans out there, you have done so much for all of us!

I started with a collage of some of the best pictures he has from the time he served, as well as a picture of him on his 92nd birthday.  I used the Chomas Creations adjustable pen holder for the Silhouette/Cameo with the Chomas Creations mini gel pens, yes they work in the adjustable holders!
I drew the title and the journaling lines with the Chomas Creations adjustable pen holder and the black metallic mini gel pen from the Chomas Creations assorted pack of mini gel pens.  You can download the journaling file for Studio here... rectangle journal
If you would like to read the journaling on this page, click on the photo to enlarge it.

And here is the full page!

You can use the coupon code november15 to save 10% off in the Chomas Creations store.


Like what you see? Leave a comment to let me know!

Wednesday, October 07, 2015

No tricks only treats layout with Chomas Creations engraving tip

Figured I had to get one more layout done for Halloween this year before I move on to Thanksgiving and Christmas pages!  Happy Halloween everyone!  May your holiday only be filled with treats hehe!!


I used the Chomas Creations engraving tip in the Silhouette Cameo to etch the spider web design in the Core'dinations cardstock.

The title was a download called no tricks only treats from the Studio store.

I did my journaling on a thought bubble I made using the Chomas Creations adjustable pen holder.  You can get the free Studio share here... thought bubble
Here is the finished layout of all my trick-or-treaters ready to get some treats!! 
 Want to try what you have seen on this blog? Use the coupon  code october15 to save 10% off your order in the Chomas Creations store!


Like what you see? Leave a comment to let me know!

Monday, September 28, 2015

School time layout with Chomas Creations adjustable marker holder

So I've been scrapbooking for 15 years now, and something that happens when you have been doing any craft that long is you get a lot of "stuff".  I have overwhelming amounts of "stuff" here so I'm trying to use some of it up on my layouts, that or I give it to the kids to make things with!
And another thing, I got in trouble by my daughter for scrapbooking last years' school pictures this year and I was told I HAD to make this years scrapbook page this year.  So late into school, but here is a back to school layout!
This corkboard has been sitting around for years.  I found out you can draw on it with Sharpies, so that is how I did my title! I added the Chomas Creations adjustable marker holder to the Silhouette and used a full sized fine point Sharpie.  Hey if it fits under the Silhouette rollers, I'll give it a try!

The embossed start was done with a stylus in the Chomas Creations adjustable holder.  I made a bunch a long time ago so I could just grab one as needed!
The journaling was done on one of my thought bubbles and the Chomas Creations adjustable holder.  You can find the share and tutorial for these here... thought bubbles  The star here was an old chipboard star that was glitter pink.  I just removed the first few layers of the chipboard and drew on it with the Sharpie.
Here is my layout with 3 of my 4 heading back to school!  My 2 youngest are holding up their signs I made with the Chomas Creations adjustable marker holder and white gel pen on black cardstock!  

 Want to try drawing with your Silhouette?  Use the coupon code september15 in the Chomas Creations store to save 10% off your order and get you started!


Like what you see? Leave a comment to let me know!

Tuesday, September 22, 2015

Flower embossed card with Chomas Creations adjustable pen holder

I was informed that the Papermate Eraser Mate ball point pens work very well with embossing powders!  And guess what?  They fit in the Chomas Creations adjustable pen holder perfectly!  And I should mention I bought the 5 pack for just $1 on Amazon!
Silhouette Studio has tons of sketches right now for download, this is one of them that I drew with the Chomas Creations adjustable pen holder and the Papermate pen.  I added black embossing powder to the design then heat set it with my embossing gun.  Pretty nifty!

I think I need some practice on the wet embossing though, I may have heated it too long hehe!
Want to try anything you have seen on my blog? Use the coupon code sept15 to save 10% off your order in the Chomas Creations store!


Like what you see? Leave a comment to let me know!

Wednesday, September 16, 2015

Have a sweet birthday card with Chomas Creations adjustable pen holder

I couldn't wait to try these Sakura Moonlight gel pens I found on black paper, the front of the package said "paint like effect writes on dark paper".  So I gave them a shot in the Chomas Creations adjustable pen holder in the Silhouette.
These gel pens are a bit wetter then most, so I slowed my speed to 3, and used a pressure of 10.  The sentiment was a paid download from Studio store.  The cupcakes were from a free font called MTF Sweet Dings.  She has a lot of free fonts and ding bats, so that site is worth checking out!  I also used a stylus in the Chomas Creations adjustable pen holder to score this card.  There is a tutorial for scoring with the Silhouette here... scoring cards
Here is the completed card.  I love how this bright blue and turquoise showed up on the card! 
Want to try anything you see on my blog on your own?  Save 10% off your entire purchase in the Chomas Creations store when you use the coupon code september15.


Like what you see? Leave a comment to let me know!

Back to school sign with adjustable holder for the Cricut Explore.

I love making these signs for the kids to hold up on the 1st day of school!  Easy way to show off all the info when you look back!   Explore tools

This is with a Gelly Roll gel pen in the Chomas Creations adjustable pen holder.


This is the adjustable pen holder for the Explore.  You can center most gel pens to draw then cut.  My favorite gel pens for this are the Gelly Roll gel pens that are found in a lot of different styles and colors.  You can find them at pretty much any craft store or online.
This is the adjustable marker holder for the Cricut Explore.  It will hold up to 1/2 inch or the size of a fine point original Sharpie.  Some markers may not be centered in the marker holder.  This does mean you won't be able to draw then cut a shadow around the image you draw.  There will be ways to work around this ( I usually cut around in a circle or square, and there will be even more).


Like what you see? Leave a comment to let me know!

Monday, August 17, 2015

Addressing an envelope with the Chomas Creations adjustable pen holder

Many people have asked me about addressing envelopes with the Silhouette.  I used the Chomas Creations adjustable pen holder with a Lettering Delights thin font and a premade envelope.  The thin fonts look like they are single lined fonts but they are not.  Any thicker fonts will look like they are outlined.
I added a rectangle as my template for my address.  You can use the text style window to pick a font and type it out. Or you can copy and paste your addresses from your computer.  Simply select the address you want, copy it, then right click on your Studio mat, and click paste. 
Now select your address and right click on your Studio mat and click edit text.  From here you can change your font size, as well as type.
I did add a rectangle on my Studio mat as the shape of my envelope so I could line up my envelope on my Silhouette mat.  Then I used cut line settings in Studio to turn the rectangle off so I could just draw my text.

Add your envelope to your mat according to where you added your addresses in Studio and add your pen (I used Staedtler triplus fineliner as they don't  smear and give you fine details) to your Chomas Creations adjustable pen holder.  I used a speed of 6 and a pressure of 9 to draw this.

And here it is! 
Want to start addressing your envelopes for the holidays?  Use the coupon code august15 in the Chomas Creations store to save 10% off your purchase!

Like what you see? Leave a comment to let me know!

Wednesday, July 22, 2015

Adore you with Chomas Creations engraving tip

I'm so lucky to have these 3 beauties as my nephew and nieces!  Photography by me of course!  And as you can tell I adore them!
I used the Chomas Creations engraving tip in the Cameo to etch the heart background onto Core'dinations cardstock.  I used a pressure of 33, a speed of 6 and double cut to etch the design.
I lightly sanded the design for the distressed look that I got!  And by lightly I do mean lightly!
The title was a Studio download called adore you.  The heart was already in the title.  I did layer the cuts to make them stand out a bit!
I used the Chomas Creations adjustable pen holder in the Cameo with a Sakura Glaze pen to draw the journaling lines in hte circle.  You can get the download for the journaling circle here... journaling circle
I added some ribbon and my super cute picture to my page and voila!  Another scrapbook page done!  I'm on a roll!  I didn't realize how much I missed scrapbooking until I stopped for awhile (not on purpose, just busy!)
Don't forget to use the coupon code july15 at checkout in the Chomas Creations store to save 10% off your purchase!


Like what you see? Leave a comment to let me know!