Easier shopping is here!
For those that wanted easier shopping, click on the shopping tab above or visit http://www.amychomas.com/
We are now taking credit card payments, or you can still use paypal! Any questions, you can send them to amyc222@yahoo.com
Want to learn how to use your new holders? Look to the right of my blog to see everything in categories!
We are now taking credit card payments, or you can still use paypal! Any questions, you can send them to amyc222@yahoo.com
Want to learn how to use your new holders? Look to the right of my blog to see everything in categories!
Monday, December 30, 2013
Linen gift tags with Chomas Creations adjustable marker holder
Sometimes I am just lolly gagging around the internet and I run across something that amazes me that someone did with the Chomas Creations tools! I asked Lauri Springer from the latest from lauri if I could share these awesome Valentine's gift tags with you! She said YES! So here they are! She made the tags from scratch (WOW!!!) and then drew on them with the Chomas Creations adjustable marker holder and a no bleed Sharpie marker. You can also find these tags (if there are any left they are so cute!) and some other amazing things Lauri has done in her etsy store my creative frenzy! Stop by Lauri's blog the latest from lauri and leave her some love if you have time!
Don't forget to use the coupon code winter13 in the Chomas Creations store to save 10% off your order!
Like what you see? Leave a comment to let me know!
Wednesday, December 11, 2013
Robot birthday card with Chomas Creations adjustable marker holder
Young boy birthday cards are a tough one for me! Give me girly, flowery any day and I can make a quick card. But a boy card? Not so quick!
But what could be better for boy then robots and silver and black and dark blue? Well nothing!
I found these Sharpie markers that are a fine point on one side and an ultra fine point on the other that fit in the Chomas Creations adjustable marker holder. Sharpies work awesome on glossy surfaces like this silver glossy cardstock that I found at Target, 2 pieces for under $1!
The sentiment and robot were both Studio store downloads.
Like what you see? Leave a comment to let me know!
But what could be better for boy then robots and silver and black and dark blue? Well nothing!
I found these Sharpie markers that are a fine point on one side and an ultra fine point on the other that fit in the Chomas Creations adjustable marker holder. Sharpies work awesome on glossy surfaces like this silver glossy cardstock that I found at Target, 2 pieces for under $1!
The sentiment and robot were both Studio store downloads.
Want to try out some of these fun ideas? Use the coupon code december13 to save 10% off in the Chomas Creations store.
Like what you see? Leave a comment to let me know!
Monday, December 09, 2013
Letters from Santa with Chomas Creations adjustable holders
I'm sad to say that my house is getting to the sad age where the kids are starting to doubt Santa. That just makes me so sad =( I'm kicking it up a notch with some letters addressed to my kids from Santa. Of course I couldn't use my own handwriting, and I want them to be handwritten, so bring out the Cameo!
I used the Chomas Creations adjustable holders with gel pens to draw these letters from Santa. But look close, notice anything missing in this picture??
If you noticed my arrows, you may also notice that I'm using NO MAT! That is because you can add a 12 inch piece of cardstock right in your Silhouette machine without a mat and draw on it! How awesome is that? You do have to move your white roller over a notch (your roller is usually where I'm showing the #1, you need to move it to #2) so the paper will fit under the rollers. You also want to use load media instead of load mat so that your writing starts where you see it on the screen in Studio.
Like what you see? Leave a comment to let me know!
I used the Chomas Creations adjustable holders with gel pens to draw these letters from Santa. But look close, notice anything missing in this picture??
If you noticed my arrows, you may also notice that I'm using NO MAT! That is because you can add a 12 inch piece of cardstock right in your Silhouette machine without a mat and draw on it! How awesome is that? You do have to move your white roller over a notch (your roller is usually where I'm showing the #1, you need to move it to #2) so the paper will fit under the rollers. You also want to use load media instead of load mat so that your writing starts where you see it on the screen in Studio.
I used the Lettering Delights thin font called Casual to write the letters to my kids. I also loaded the envelopes straight into the Silhouette with no mat to draw their names on the front!
Don't they look like they are hand written letters!? You can't get that from a printer! And these are in metallic gel pens!
Want to give it a try? Use the coupon code december13 to save 10% off your purchase in the Chomas Creations store!
Like what you see? Leave a comment to let me know!
Sunday, December 08, 2013
Have yourself a merry little Chistmas with the Chomas Creations adjustable holders
I was too excited to share this with everyone! Karla Moore is a part of a facebook group I am in and she gave me permission to share this, and even gave the names of the fonts she used! Have is cupcake block sketch; yourself-Simon script; A - neoretro draw; have- Helena; merry-Archistico; Christmas- Quito and the snowflake - bergamot ornaments.
She used the Chomas Creations adjustable pen holder with a Gelly Roll white gel pen on a large piece of black poster board that she trimmed down to fit in this frame. Looks amazing Karla! Thanks so much for letting me share it!
Like what you see? Leave a comment to let me know!
She used the Chomas Creations adjustable pen holder with a Gelly Roll white gel pen on a large piece of black poster board that she trimmed down to fit in this frame. Looks amazing Karla! Thanks so much for letting me share it!
Like what you see? Leave a comment to let me know!
Tuesday, December 03, 2013
Christmas tags with the Chomas Creations adjustable pen holder
Time for Christmas tags! I love to make my own, so much more personal, don't you think??? And being I have enough ribbon in my stash to wrap around the earth a few times, it is a great way to use some up! If you would like to make your own tags, I have the share here... Christmas tags
I also have a tutorial as well as another Christmas tag file share here... tag tutorial
Here is just a start of this years tags! I will be doing more in different colored cardstock and may switch the design around! I used the Chomas Creations adjustable pen holder with a Sakura Moonlight gel pen on kraft cardstock.
Ready to make some of your own? Use the coupon code december13 to save 10% off your order in the Chomas Creations store!
Like what you see? Leave a comment to let me know!
Tuesday, November 05, 2013
Make your own labels with the Chomas Creations holders
Tis the season for needing gift tags to decorate your holiday goodies! If you would like a gift tag share and tutorial, you can see that on my blog here... gift tags
I LOVE the look of kraft cardstock and wanted to label some of the jars I'm filling up. As much as I would like to say these are gifts, these are for me me me, hehe. I whipped up some coconut oil which makes it easier to rub into your skin and added some of my Young Living essential oils to make a pain relieving mix.
I used the Chomas Creations adjustable pen holder with a Sakura Moonlight gel pen (love the way these pens look on kraft cardstock!) to draw the design. Being these are very juicy pens I used a speed of 1 and a thickness of 1. The font is Aunt Jana's sketch from the Studio store. The dashed line was made using the cut settings in Studio. The kraft cardstock is the self adhesive cardstock from the Silhouette store.
Want to make your own tags and labels this holiday season? Use the coupon code november13 at checkout in the Chomas Creations store to save 10% off your purchase!
Want to learn more about a more natural way of healing your mind and body? For years now I have used peppermint oil to relieve my headaches before reaching for
Monday, October 28, 2013
abc thanks card with Chomas Creations adjustable holders
I needed a quick thank you card for my daughter's teacher and love the look of "chalk" on "chalkboard" this is hot right now. I created this card in Studio and you can get the share for it
here... abc thanks The font I used is a Lettering Delights thin font called Sparkle.
I used the Chomas Creations adjustable marker holder with a white Signo Uniball gel pen (adjust your speed to 1 and thickness to around 3) to draw the design. I also used a stylus in the Chomas Creations adjustable marker holder to score my card. There is a tutorial for scoring cards here... score card
Ready to give the Chomas Creations tools a try? Use the code october13 at checkout to save 10% off your order in the Chomas Creations store.
Like what you see? Leave a comment to let me know!
Thursday, October 17, 2013
Square 1 vinyl and the Chomas Creations adjustable holders
Guess who was asked to be a designer for Square1 adhesive backed fabric??? THIS GIRL! hehe Square1 is the un-vinyl.
Being I have been looking for a vinyl I like for a long time, I was happy to say, YES! But of course before I try to say you just have to have something, I decided to take a few things for a test run!
My first stop was permanent vinyl on my daughter's water bottle. I had tried a different brand vinyl and when I washed the water bottle 2 of my 4 letters came off. I added the white permanent vinyl to my daughter's water bottle and washed it a few times and let her take it to school. A couple of weeks later and the vinyl is still going strong!
Here is another fun thing I did with the permanent vinyl. We have a problem in our house with the toilet seat getting lifted by the boys. So far the reminder worked! Yes I'm surprised! hehe
The coolest vinyl that Square1 has to offer? Has to be the GLOW IN THE DARK! I thought it would be fun to put it on the ceiling over my son's bunk bed. But when he wakes in the morning I wanted him to still be able to see something fun on his design, so I added "love you, mommy" with the Chomas Creations adjustable marker holder and a fine point, original Sharpie marker.
It is easy to add permanent marker to your vinyl. Here is tutorial showing just how I did it!
Highlight your entire image (a), go to cut line settings (b), click no cut (c).
Add your Sharpie to the Chomas Creations adjustable marker holder. Draw your image. With Sharpies you want a slower speed (4) and a very small thickness (1) so you don't crush the tip of your Sharpie, and so it doesn't smear.
Again highlight your entire image (4), click cut (5).
Now highlight the image you don't want to cut (6) and click no cut (7).
Take out your marker holder and replace your blade. With the glow in the dark vinyl I used a blade depth of 3, a thickness of 10 and a speed of 8.
I weeded out the extra vinyl but kept the inside letters for "I love you".
I added it to the ceiling above my son's bed. He loves it!
Here it is at night. Man is glow in the dark hard to get a picture of!
Like what you see? Leave a comment to let me know!
Being I have been looking for a vinyl I like for a long time, I was happy to say, YES! But of course before I try to say you just have to have something, I decided to take a few things for a test run!
My first stop was permanent vinyl on my daughter's water bottle. I had tried a different brand vinyl and when I washed the water bottle 2 of my 4 letters came off. I added the white permanent vinyl to my daughter's water bottle and washed it a few times and let her take it to school. A couple of weeks later and the vinyl is still going strong!
Here is another fun thing I did with the permanent vinyl. We have a problem in our house with the toilet seat getting lifted by the boys. So far the reminder worked! Yes I'm surprised! hehe
The coolest vinyl that Square1 has to offer? Has to be the GLOW IN THE DARK! I thought it would be fun to put it on the ceiling over my son's bunk bed. But when he wakes in the morning I wanted him to still be able to see something fun on his design, so I added "love you, mommy" with the Chomas Creations adjustable marker holder and a fine point, original Sharpie marker.
It is easy to add permanent marker to your vinyl. Here is tutorial showing just how I did it!
Highlight your entire image (a), go to cut line settings (b), click no cut (c).
Highlight the image
you want to draw (1), go to cut line settings (2) and click on cut.Add your Sharpie to the Chomas Creations adjustable marker holder. Draw your image. With Sharpies you want a slower speed (4) and a very small thickness (1) so you don't crush the tip of your Sharpie, and so it doesn't smear.
Again highlight your entire image (4), click cut (5).
Now highlight the image you don't want to cut (6) and click no cut (7).
Take out your marker holder and replace your blade. With the glow in the dark vinyl I used a blade depth of 3, a thickness of 10 and a speed of 8.
I weeded out the extra vinyl but kept the inside letters for "I love you".
I added it to the ceiling above my son's bed. He loves it!
Here it is at night. Man is glow in the dark hard to get a picture of!
The extra "I love you" went next to my daughter's bed. Here it is during the day and at night.
Like what you see? Leave a comment to let me know!
Tuesday, October 08, 2013
Take me out to the ballgame with Chomas Creations adjustable pen holder
While watching my niece's softball game this summer I got this picture of my youngest son intently watching and then I remembered that I had a picture of him 6 years ago doing the same thing at his brother's game. What a difference! Funny he was wearing orange both times hehe!
I used the Chomas Creations adjustable pen holder with a Sakura Moonlight gel pen to draw the baseball stitching design at the top and bottom of my page. Look how nice it looks on kraft cardstock!
I also used the Chomas Creations adjustable pen holder to draw the journaling lines in my thought bubbles. I have a tutorial on how I made them as well as the share here... thought bubbles
Here is my completed page with Jack at 1 and at 7.
Want to try drawing with your Silhouette? You can use the coupon code october13 to save 10% off in the Chomas Creations store to get you started!
Like what you see? Leave a comment to let me know!
Wednesday, September 11, 2013
Black & white card with the Chomas Creations adjustable pen holder for the Cricut
I've always loved the look of white gel pen on black cardstock! Now that the Expression2 is out, and there is no lip to block the height of the pens you put in the machine, Chomas Creations now has an adjustable pen and marker holder for it! You can get more info on the new Chomas Creations adjustable pen holder and adjustable marker holder here... Chomas Creations
So I used the new Chomas Creations adjustable pen holder to hold the Uniball WHITE gel pen. . This is from the Cindy Loo cartridge.
The dots are all Viva Decor, love how that stuff stays poofy!
Want to give it a try? Use the coupon code september13 at checkout in the Chomas Creations store to save 10% off your order!
Like what you see? Leave a comment to let me know!
Thursday, September 05, 2013
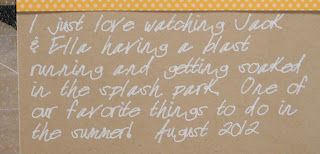
Splish splash layout with Chomas Creations adjustable marker holder
My friend Kay at Clever Someday was telling me that iPad has an app that lets you make your own fonts! Super duper easy to use to! You just draw each letter, number and symbol you would like to have, and then they email you the font! The program was called urFonts. The cool thing if you can pick the line thickness on your fonts, which I did for my font, I made it super thin! You can get my font here... Amy Font I've had a few people ask if my handwriting is a font, well now it is! lol
Here is my font drawn right on my 12x12 cardstock with the Chomas Creations adjustable marker holder and a white Signo Uniball gel pen.
I cut my title out of my 12x12 cardstock and added my patterned paper behind the background paper.
Want to try this out with your Silhouette? Use the coupon code september13 to save 10% off in the Chomas Creations store!
Like what you see? Leave a comment to let me know!
Here is my font drawn right on my 12x12 cardstock with the Chomas Creations adjustable marker holder and a white Signo Uniball gel pen.
Yes I could have just written the journaling on the page. But sometimes you run out of room, or the journaling starts to lean, and isn't lined up. This way I knew exactly where it was going and what it was going to say!
I cut my title out of my 12x12 cardstock and added my patterned paper behind the background paper.
Here is the completed page, notice the focus is on my pictures, as I have a lot hehe!
Want to try this out with your Silhouette? Use the coupon code september13 to save 10% off in the Chomas Creations store!
Like what you see? Leave a comment to let me know!
Labels:
scrapbook pages,
Shared Silhouette files,
thin fonts
Tuesday, September 03, 2013
Back to school sign with Chomas Creations adjustable pen holder
One last back to school sign as my daughter that is in her 2nd year of college just asked me "where is mine?" So here is Taylor's sign!
I saw these gel pens that are Target's generic brand, up & up in action on some of the facebook pages, so I had to give them a try. These are in the pen section at Target, I found them on the bottom shelf. There are 24 gel pens here and they cost me just $10.49! Not a bad deal at all! And some of the colors work great on black! Very exciting! These all fit in the Chomas Creations adjustable pen holder.
I used a speed of 4 and a thickness of 10 to write with these. There was some skipping, but that is easy to fix! Just don't remove your project from the Cameo and draw it again. The lines will draw right over! You can increase the thickness and slow down your speed for better results.
These fonts are all from Da font. Listing from top to bottom...
KG Second Chance
Sketch Serif
Denne Threedee
Sketch Serif
Like what you see? Leave a comment to let me know!
Friday, August 30, 2013
The biggest difference between the adjustable pen and adjustable marker holder...
I get asked this question A LOT! The biggest difference between the Chomas Creations adjustable pen and adjustable marker holder is of course the size. The adjustable pen holder is 3/8 inch in diameter and the adjustable marker holder is 1/2 inch diameter. But what does this mean when using gel pens in the adjustable marker holder? Well you are going to get what they call an offset (meaning the gel pen is NOT centered in the holder). Now this means that if you want to draw an image, when you go to cut it it isn't going to be centered when you try to cut your shadow. The adjustable pen holder is very close to center with most gel pens (Chomas Creations mini gel pens, Sakura, Gelly Roll, and more). So when you go to cut your shadow with these gel pens, it is going to line up right for you. If you go to put these same sized gel pens into the adjustable marker holder, you will notice you have to tighten the screw quite a bit, making it even further off center.
Here is a card I made using the Chomas Creations adjustable pen holder for the Cricut with a Chomas Creations black mini gel pen (if you own the Expression 2, you can use any length gel pen!) Notice how the shadow cut around the design very nicely! If you want to try to make this card with Once Upon A Princess in Cricut Craft Room, I have the file here... birthday party
Oh and notice how far my cupcake pops off the page? That is an Action Wobble Spring! How neat is that? I'm going to make my cards more fun with these hehe!
Like what you see? Leave a comment to let me know!
Subscribe to:
Posts (Atom)