20pcs. Combo pack of assorted colors and shapes for $17.00 - Free Shipping
after applying the coupon code ASS-DT1 for $12.98 credit on shipping.
10pcs pack of individual shape sells for $8.98 and does not qualify for free shipping
with the code, but 2 pack will qualify for the Free shipping after applying the coupon.
The coupon is good for your group on these items plus other items in the store when
the aggregate purchase is more than $16.98, then he//she gets the $12.98 shipping
discount after applying the code.

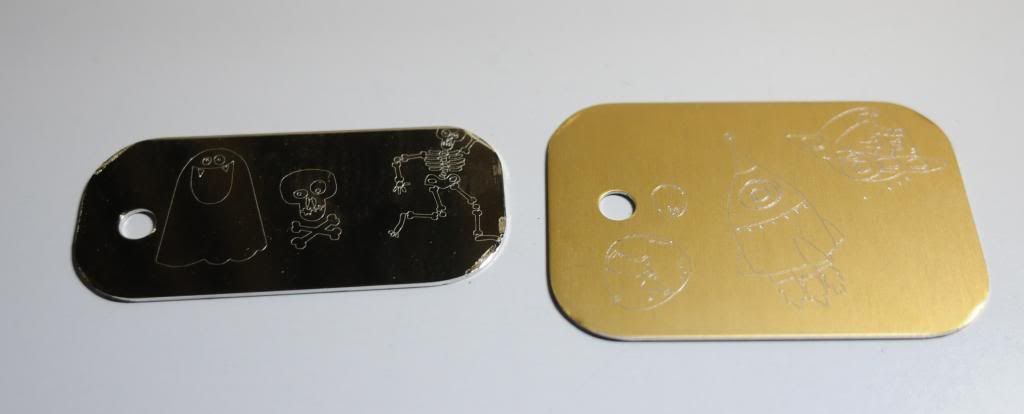
Here is one of the other types of tags I have done from Ohax Industries with the Chomas Creations engraving tip.

How about a tutorial for lining up these odd shaped pieces like shown above? If you have a tag that is shaped like a rectangle, or easy shape to recreate in Studio, you can skip these steps and go to step 3. This is more for the odd shaped tags you would like to engrave on. So pretend my rectangle is an odd shape, but then you get an idea on how to do this. You could also use this tutorial for drawing with the Cameo as well!
1. First I used a BLACK pen to trace the tags I wanted to use. These are some sample tags I was sent, but there were a lot in the same size, just different colors. This will work for any size.

2. I then scanned my traced paper and opened the image in Silhouette Studio. I used the trace function in Studio. First you click on select trace area (1), then you highlight what you want to trace (2), then click on trace outer edge (3), and finally adjust the high pass filter so your image is all yellow lines.

3. Now because I want to line up my letters on my tag, I need to figure out where they are going to be in my machine. I used the Chomas Creations adjustable pen holder with a pen to draw my tags on a piece of scrap paper.

4. Now I want to turn off the cut lines for when I am engraving. To do this first click on the image of the scissors (1), then click on your image, in this case the tags (2), and then click on no cut (3).

5. You can add any text or designs you would like to the Silhouette Studio file.
Now add the Chomas Creations engraving tip to the Cameo. Add the tags to your scrap paper with some glue dots, these are easy to scrape off after you engrave. I used a thickness of 33, a speed of 4, and checked double cut.

So now you are probably wondering where I am getting these fonts? Well Kay at Clever Someday has 2 posts on her blog with these engraving fonts. Kay has used as fill fonts, hmmm... going to have to give it a try! The Cameo is a lot quicker then you would think it would be in doig this.
Don't forget to use the coupon code cozy10 at checkout in the Chomas Creations store to save 10% off your purchase of $30 or more!
Like what you see? Leave a comment to let me know!

6 comments:
Great blog! I just purchased my first every silhouette. I have the portrait as I couldnt afford the cameo, but my question is can i do engraving with the portrait and can I still do engraving even though I don't have the designer edition software?
Please let me know thank you so much for having a great blog to read!
Yes you can do engraving with the Chomas Creations engraving tip in your Portrait and you do not need the Designers Edition software! And thank you! Amy
Hi I was wondering what else do you do to hold the media in place when you engrave, for example the rollers, and or the mat. I did everything in your blog tutorial and went to cut and the mat was just dancing in my machine as it cut. Did you also keep the setting to the pen setting or did you move that to custom media? TIA
HI
I would like to know if it is possable to engrave on glass with the engraving tip?
Thanks
Johan I'm not sure. The pressure may crack the glass.
Post a Comment