Easier shopping is here!

For those that wanted easier shopping, click on the shopping tab above or visit http://www.amychomas.com/

We are now taking credit card payments, or you can still use paypal! Any questions, you can send them to amyc222@yahoo.com

Want to learn how to use your new holders? Look to the right of my blog to see everything in categories!


Showing posts with label adjustable holders. Show all posts

Friday, December 11, 2020

Christmas tags with the Chomas Creations adjustable pen holder

I love making my own Christmas tags for a fun homemade feel when wrapping (or bagging hehe) my gifts.  I have used these tags in the past and you can find the file for them here... tags
I like to draw the design first which I used a Gelly Roll gel pen in the Chomas Creations adjustable pen holder for the Cameo 4 to draw.  You can also do this with any other Silhouette machine with the Chomas Creations adjustable pen holder for the Silhouette.
In order to draw first I send my image over to draw & turn off all the lines I don't want to draw by highlighting them and choosing no sketch.  Notice because I am drawing I select sketch, and then pen.  Now the "cuts" I need to make will not draw as they have been turned off.  Notice what I am drawing is a brighter thicker lined red, and anything not being sent right now is a thin line.
Next I'm going to select everything and set that to no sketch.  
Now I'm going to select cut, and I'm using the auto blade.  Now the items I want to cut I highlight & click the cut option.  Now the only thing being sent once again is the cut lines as you will notice they are thicker lined red.
And look at that a whole sheet of Christmas tags! 

I added some ribbon and will use double sided adhesive to add these to any present or I can just tie them on the handles of any gift bag I may have!  I think they add a fun personal touch!


Like what you see? Leave a comment to let me know! Thanks Amy Chomas

Saturday, January 28, 2017

Baby goodies layout with Chomas Creations adjustable marker holder

Looking for the perfect way to add all of those goodies you got when you were at the hospital with your newborn? Well here it is! I got the hat, bracelets, and foot prints all on one page that easily slides into a 12x12 page protector to go in your album! I also did these layouts for my older children, but with the Cricut it was a million times easier!
I used a Ultra Fine point Sharpie in the Chomas Creations adjustable marker holder to write the name, date & time on the transparency and added some cute trinkets behind them.

Between a sheet of patterned paper and white card stock I added form core board.  I did cut it smaller then 12x12 to fit into my page protectors and used an exacto knife to cut out the squares to add my goodies to.


Wednesday, November 25, 2015

Clear cardstock card with the Chomas Creations marker holder! And a big sale!!!!


I just can't get enough of the clear cardstock, and there are sooo many ideas rolling around inside my head!  I started by "drawing" the snowflakes with the Chomas Creations marker holder and an ultra fine Sharpie in the Cricut.   I got this clear cardstock to give a try from Papertrey Ink.
I have this flocked vinyl from Silhouette that I used to do the snowy hills and the snowmen, and the snow on top of the trees, it cuts easily with the Cricut. The hills I just hand cut with an exacto knife.  The snowmen are on the front of the card, and the trees are on the inside of the card!


Of course no snowman is complete without googly eyes!!! 


Like what you see? Leave a comment to let me know!

Thursday, September 15, 2011

You are out of this world layout

Ok, so sometimes I like how a card turns out so much I try using the inspiration for a layout!  It is hard to come up with loads of ideas all the time, so why not??? 

I used the DS file here... out of this world file to make a card (see post below), and then changed the file up a bit to make a 12x12 layout with it!  The card file and the layout file are both in that same download.
I used the adjustable marker holder to draw the title on Colorbok metallic sheets (I got 2 of them sized 12x12 at Target in the scrapbook aisle).


Of course the journaling circle was done with the Chomas Creations mini gel pen holders.   You can see a tutorial on how to do that and get the file for it here....  journaling circles


All of the papers and chipboard stickers are October Afternoon, as is the super busy boy on the page hehe!


Like what you see? Leave a comment to let me know!

Tuesday, September 13, 2011

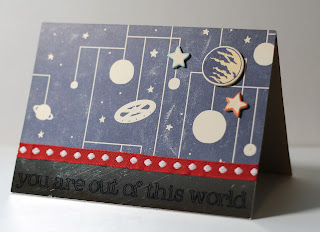
Out of this World card with Chomas Creations micro Sharpie holder

A fun birthday card for my nephew's birthday!  You can download the file for this using DS with George and Doodletype here... out of this world card

I used the adjustable marker holder for the title with Doodletype.  I found this Colorbok metallic paper at Target for $1 for 2- 12x12 sheets!  Pretty snazzy!
The papers and chipboard stickers are all October Afternoon. 


Like what you see? Leave a comment to let me know!

Friday, April 29, 2011

Rock On birthday card with Chomas Creations micro Sharpie holder

My youngest son's 5th birthday is right around the corner (ok, now how did my baby get to be 5??) so I wanted to make him a fun rock star birthday card, as he totally rocks hehe!  I love the clear cardstock for making cards and layering them, and what could be better on the clear cardstock then the Chomas Creations micrio Sharpie holder?  The Sharpies are permanent and don't smear on slippery surfaces like this.  And I also offer 8 colors of micro Sharpies for sale on my blog!
I designed a rock star card with Design Studio and the Birthday Bash cartridge using 2 different layers for the red & blue stars on the card.  The file is available for download here... Rock on birthday card file

To get this effect is easy!  First you add the Chomas Creations micro Sharpie holder and the red micro Sharpie.  Use the red draw page in the Design Studio file to draw the red stars.

Now without removing your mat from the machine, using a scrap piece of paper under your micro Sharpie to protect your card, remove the micro Sharpie holder from the machine.  Replace it with the blue micro Sharpie and draw the blue draw page in the Design Studio file.

Again without removing the mat from the machine, using a scrap piece of paper remove the micro Sharpie holder from the machine.  Replace your blade and cut the cut card page layer.


Now you have 2 different colors of drawn stars on your card.  If you want to do something similar, you could add as many layers as you need to, just make sure everything lines up by copying and pasting on different layers.

Here is the front of the card with the title also added on.  I cut 4 layers of the title to add to the front of my card to make it pop up even more.


So where do your write your card sentiments for these cards?  Well for this one I cut 2 big yellow stars and added an extra to the back of the card to write on for the birthday boy!


Also!  Tomorrow is the big Disney/Pixar blog hop!  Be sure to drop by at 6 am eastern time (ok, so I'm posting ahead of time, I don't get up that early, hehe) for the start of the hop!  Lots of awesome blogs for this 2 day hop this time!!

Like what you see? Leave a comment to let me know!

Thursday, February 03, 2011

Birthday card with Chomas Creations micro Sharpie holder

It is my Gramp's 92nd birthday (WOW) so I made him this card!  It was actually quite simple.  I used the Birthday Bash cartridge for the title, and the card shape. 
 Black, blue, red, green, orange, purple, aqua and berry!!!  I used a pressure of minimum and multi-cut of 2 to get a nice look to the writing.
When cutting through clear cardstock I use multi-cut on 4, this gets it through all the way.


Like what you see? Leave a comment to let me know!

Saturday, January 15, 2011

Bumblebee Transformer layout with Chomas Creations embossing and micro Sharpie

Transformers, Day 2!  My son is also a big fan and there was no getting out of making him a Transformers layout!  Which he has already claimed as his own and he wants to hang in his room!  lol  The download for this image is at the bottom of this post.
I took the same image for the birthday card for Make-the-Cut that is yesteday's post, added Bumble Bee's name instead, and again embossed that with the Chomas Creation's embossing kit on black Ten Seconds Studio metal sheet (face down).  I then sanded the debossed side for this look...

Then I took the Transformer image, used the duplicate feature in Make-the-Cut and added a bunch to my page, and used the Chomas Creations micro Sharpie holder to draw the image on a silver metal sheet.  I always start with the micro Sharpie on minimum pressure, and adjust according to the machine if I need to. 

Last of all I added some journaling strips and some cool gears by Little Yellow Bicycle.
If you want the download for the Transformer embossed image, and the micro Sharpie image, head on over to here to download... Transformers Bumble Bee 

Like what you see? Leave a comment to let me know!

Monday, November 08, 2010

Ready for another card with clear cardstock and the mini Sharpie holder?

I couldn't wait to get this idea on a card! I loved how the sketch flowers turned out on my so sweet page, seen here... sketch flower page If you click on that link, you can also get information on where to get the sketch flower download. I wanted to try the sketch with the ultra fine point Sharpie  on the clear cardstock, and can I just say how impressed I am? Look how cool this turned out! I'm going to try for some better pictures, but I had to share this cause I loved how it turned out!


The flowers were drawn on the front of the clear cardstock, the green hills are layered right behind the flowers on the inside front of the card, and the clouds and sun are layered on the inside of the card.  It looks so neat in person! 

Like what you see? Leave a comment to let me know!

Thursday, November 04, 2010

Clear cardstock and the Sharpie holders!!!

Oooh you are going to love this one!!! This is clear cardstock that I used the ultra fine point Sharpie  on the front of (look no smearing!!!) to make a card! It was easy to make, just added a sheet of clear cardstock to my mat, and drew with the Cricut and the Chomas Creations micro Sharpie holder using the Cindy Loo cartridge. I then trimmed the clear cardstock, but I'm sure it could be easily cut with the Cricut. I also added some pearls and Basic Grey's Oliva papers and stickers. The possibilities are endless! Think flourishes and flowers and...


This is where I got the clear cardstock from... clear cardstock
Like what you see? Leave a comment to let me know!

Sunday, April 18, 2010

Fruit Smoothie with Chomas Creations micro Sharpie holder

A new layout using Preserves! For this fruit loving family I knew I needed this one! Not that I do any canning, or pie baking, or jam making, but hey I make a mean fruit smoothie lol!!
For this layout I used the ultra fine point Sharpie to draw all of the words on Quickutz clear adhesive sheets (love them, need more!), and to draw the title. I just cut the fruits out of cardstock and layered them.
As you can see, Jack really enjoys a fruit smoothie!!!


Tuesday, March 30, 2010

YOU ROCK! This phrase can be heard often in our house as we love Guitar Hero and Rock Band! Of course the funniest one to watch has to be Cameron as he makes the weirdest concentration faces! And if you think these photos are funny, you should see the video lol!
On this one I used the ultra fine point Sharpies for the very fine details on the stars and the guitar from Indie Art, it can tackle even the smallest details! I also used the Sharpie on the title, drawing out "you" with Hannah Montana. Being the Sharpies work best on glossy surfaces, I used the silver Silhouette vinyl for these.

Friday, February 19, 2010

Little Sledder Boy wtih Chomas Creations micro Sharpie holder

Little sledder boy! For those of you who know Jack, you know he is a bundle of energy and keeps me busy, so it didn't suprise me at all when he got on the sledding hill, decided to go down by himself, and conquered the hill on the way up as well, at the whopping age of 3 1/2! That kid is something else!
Here is a page I got done, I used the ultra fine point Sharpies for the title, look at how small those snowflakes are, yet you can still see every detail! You can get the cut file for this page, as well as directions on how to make it right here on Custom Crops... Little Sledder Boy