Easier shopping is here!

For those that wanted easier shopping, click on the shopping tab above or visit http://www.amychomas.com/

We are now taking credit card payments, or you can still use paypal! Any questions, you can send them to amyc222@yahoo.com

Want to learn how to use your new holders? Look to the right of my blog to see everything in categories!


Showing posts with label Silhouette. Show all posts

Thursday, January 14, 2021

Etching on acrylic with the Chomas Creations engraving tip in the Silhouette!!!

After the last post I did on my blog (look below :) ) I had to learn how to do the photo etching myself!  I did buy Kay's at Cleversomeday's ebook to get a better idea.  You can find it in Facebook group of Kay's for the Silhouette here... https://www.facebook.com/groups/silhphotoetch/
The group is filled with amazing people that are so helpful and a lot of awesome ideas as well!  You can do this with your Silhouette and Cricut machines with the Chomas Creations engraving tip :)
Here is the picture I started with.
I used a program online called remove.bg to get rid of the background.
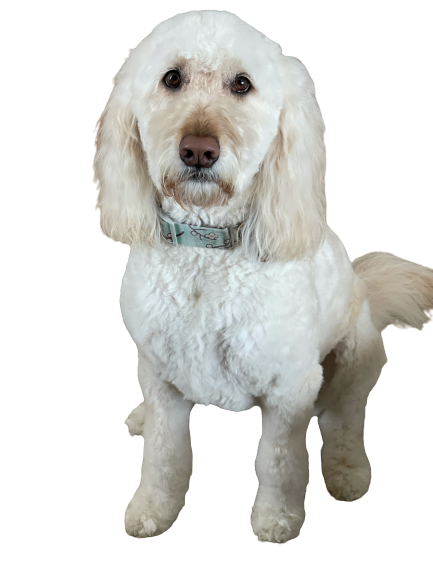
And then I used a sketch program on my iPhone to change the file to a sketch.  You don't need to do this step buy I wanted more contrast because of her light hair.
The rest you have to learn in the ebook! I just wanted to show my starting points.  Her tail was a bit cut off in the pic so I lined that up with the end of my engraved design.
Make sure when you add you acrylic piece to the mat  you use double sided adhesive or painters tape to hold your item in place. It is so important that it doesn't wiggle on the mat!
I did this with the Silhouette as I am waiting for my Explore to arrive and wanted to see how it would turn out. I was impatient and I wasn't let down at all!  I set the software to sketch, pen, and then put the pressure at 30 and the speed at 10.  

Here is my finished design!!!!  EEEEEEK!  
I did try to add a black piece of cardstock behind the acrylic piece here so you could see even more details Let me tell you how HARD it is to take a pic of acrylic LOL!  It is HARD!  You can see it so much better in real life and you can even see the detail in her eyes!


Like what you see? Leave a comment to let me know! Thanks Amy Chomas

Monday, May 18, 2020

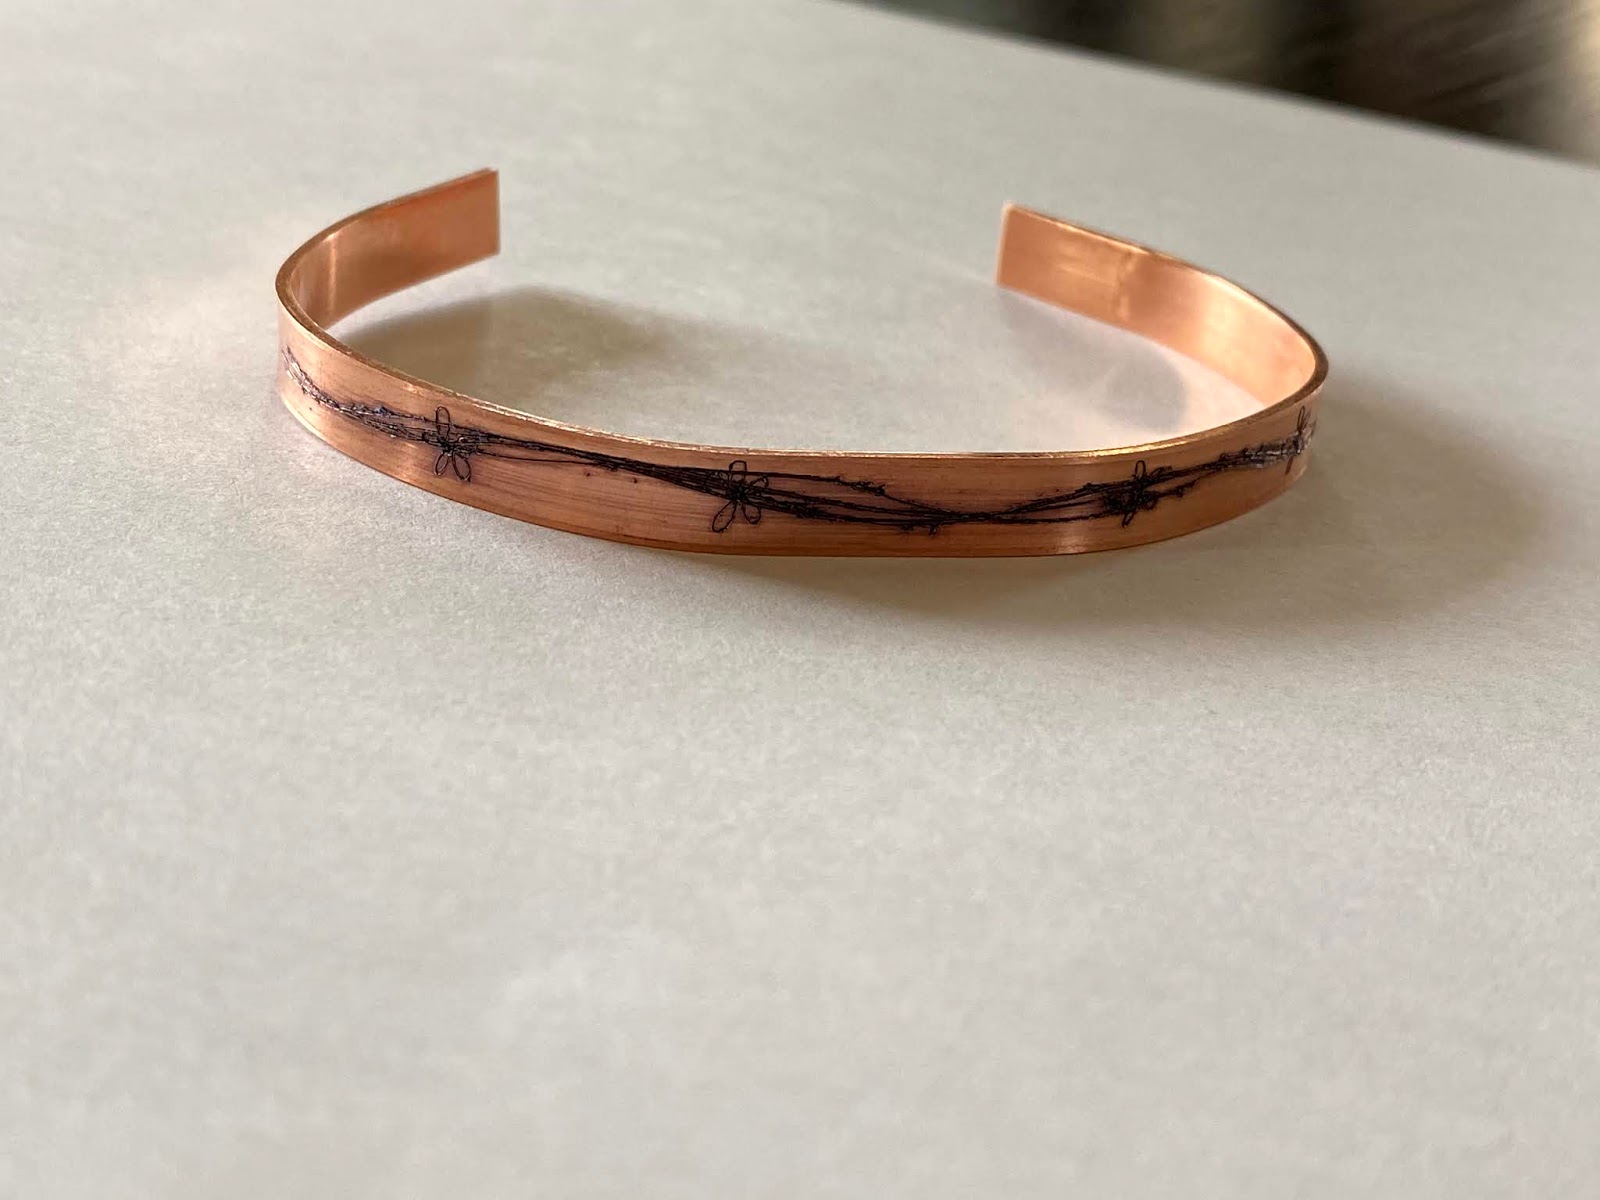
Cuff bracelets with the Chomas Creations precision tip in the Cameo 4


Playing around today with some copper blanks I got on etsy. They are the cuff bracelets so they are flat when they go into your machine and you bend them when they come out.  
I made sure to use double sided adhesive to stick them to my mat then engraved on them with the Chomas Creations precision tip.  This was in the Cameo 4 but there are also engraving tips for the entire line of Silhouette machines.   The design was from the Silhouette store. After I colored in the engraved design with Sharpie and used rubbing alcohol to get the extra off.  
I used a pressure of 30, speed of 3 and multi cut of 4.  
You can find the Chomas Creations engraving tips in my store www.amychomas.com


Like what you see? Leave a comment to let me know! Thanks Amy Chomas

Wednesday, December 11, 2019

Christmas tags with Chomas Creations adjustable marker holder in the Cameo

Tis the season to create some cute Christmas tags! I found this file on my computer and forgot I had them!  So excited to use them again for some Christmas tags!  I added the Chomas Creations adjustable marker holder with some of the American Crafts cutting machine pens to the Cameo to do these tags.  It's a quick way to make a lot of tags all at once! I even cut out some holes in the tags so you can tie them to a present or have a cute ribbon on them for fun!  You can find the Chomas Creations adjustable marker holder here


Like what you see? Leave a comment to let me know! Thanks Amy Chomas

Monday, November 25, 2019

Chomas Creations engraving tip on acrylic coasters

Getting some Christmas gifts made! I used the Chomas Creations engraving tip on these acrylic coasters from Chameleon Crafts! They even come with the rubber feet. Coasters The font is a chalkboard from called KG Second Chances. I put the settings to sketch and pressure to 30 speed to 8 and did a multi cut of 3.
I did the etching in reverse so its on the bottom and you can see it through the other side. So excited how they turned out.


Like what you see? Leave a comment to let me know! Thanks Amy Chomas

Tuesday, November 12, 2019

Chomas Creations precision tip on acrylic

Playing again with the Chomas Creations precision tip in the Silhouette on acrylic today! 
You can find the precision tip here... Chomas Creations precision tip
The details once again are absolutely amazing as this little baby is only 1 1/2 inch by 1 1/2 inch.  I actually zoomed in on the design so you could see each of these tiny circles that I used.  The small box on the left of the design is the template I cut out of cardstock to put that big design on!


Here is how it turned out!  I used a speed of 6, a pressure of 20 and a multi cut of 2.


 Here's another one I did with even more tiny details.


Like what you see? Leave a comment to let me know! Thanks Amy Chomas

Thursday, September 01, 2011

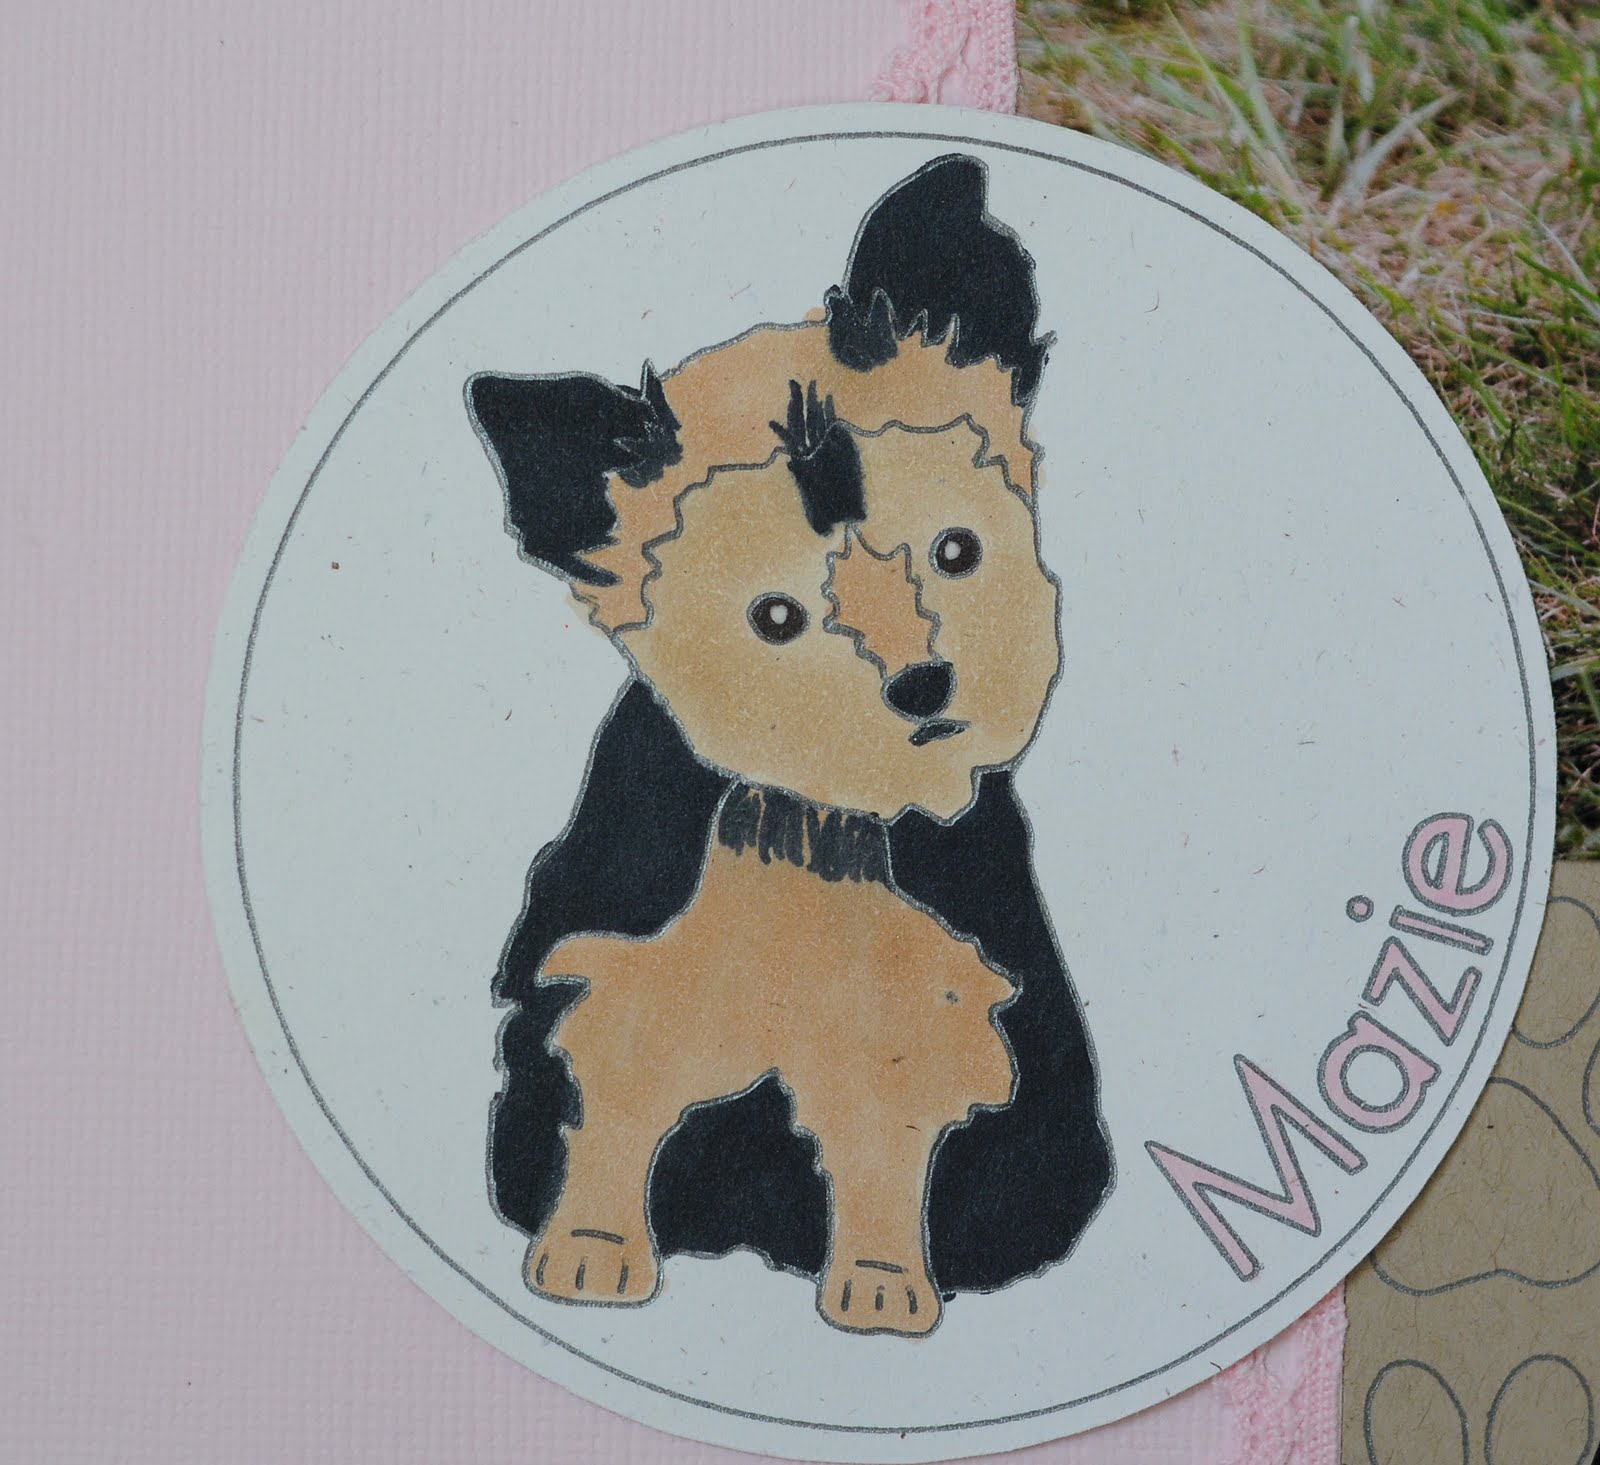
Mazie layout with Chomas Creations mini gel pen holder for the Silhouette

How could I resist doing a page with my new puppy Mazie?  And of course what puppy page would be complete without puppy paws??  You can download the puppy paws file for Silhouette Studio here... puppy paws
I used the Chomas Creations mini gel pen holder for the Silhouette to draw the puppy paws as my background page. I just love the look of the black metallic mini gel pen on kraft paper! Aren't they super cute?
I also used the paws with the Chomas Creations embossing kit for the Silhouette to emboss on a metal sheet.


I found this yorkie download in the Silhouette store and played with it a bit for the title!  I used the Chomas Creations mini gel pen holder for the Silhouette to draw the design, then the Copic markers to color it in!  Look no smearing!
Did some quick journaling on one of the journaling circles I have lying around that I made with the Chomas Creations mini gel pen holder for the SIlhouette as well!  You can see a tutorial and a download for that here... journaling circles for Silhouette
Here is the page all put together!  Gotta love the new puppy cuteness, it just adds to the page.  Now to get her to go potty outside...


And don't forget right now I have a sale going on in the Chomas Creations store!  Save 10% off your entire order when you use the coupon code back10 at checkout!

Like what you see? Leave a comment to let me know!

Thursday, August 18, 2011

gosh you're awesome with Chomas Creations mini gel pen holder for the Silhouette

Kids are amazing creatures!  They never stop amazing you!  My youngest daughter came home from school with this picture she had done.  I looked at her little person she colored to figure out what the shirt said and found out she had written the words backwards, thing was, if she was looking down at the shirt, that is what she saw!  Her shirt said Champion Talker (sooo true), and she copied it letter for letter, just backwards hehe!
Some of you may know that I love my journaling circles and shapes.  Let me let you in on a little secret, I used to spend a ton of time using the computer to do my journaling, now I just use these, and it is a bazillion times faster!  And with the lines it really helps keep things neater looking. 
I made this file for Studio with 6 journaling circles inside.  It is actually quite easy to use with the Chomas Creations mini gel pen holder for the Silhouette!  You can download the Studio journaling circle file here... journaling circles
To start, you  need to click on the outside circles for each journaling circle (1), then click on the cut option on the top tool bar (2), then click no cut as we want to draw the lines first.
Add your Chomas Creations mini gel pen holder for the Silhouette in place of the blade. Set your pressure around 10, speed of 10. I do double cut for these lines so they are nice and dark. 
Now select all of your circles (1) and click on no cut (2).
Next click just outside of each circle to select it (1) and click on cut (2).  Now you can cut your circles with the Silhouette.  Without removing your mat, carefully remove the Chomas Creations mini gel pen holder and replace it with the blade.
I like to do a bunch of these at a time to have on hand whenever I need them.


I used the gosh you're awesome title from the Silhouette downloads.


The papers for this page are all Echo Park.  The ribbon and flowers are Making Memories.  The daughter is mine hehe!


Don't forget the sale is still on in the Chomas Creations store!  You can save 10% off your purchase of $30 or more using the coupon code august10 at checkout.


Like what you see? Leave a comment to let me know!

Wednesday, August 10, 2011

Rhinestone T's!

Ok, if there is one thing I like, it is BLING!  How can I resist adding BLING to everything?  hehe Why not, right?  So I found this SUPER cute flamingo shirt from Old Navy on sale for just $4 (some were even marked down to $2!), and couldn't resist an XOXO pattern I downloaded from Silhouette Studio.  The shirt had 2 flamingoes head to head, so I thought the XOXO was perfect for this!  Did you know your Silhouette could cut these templates for head set rhinestones?  There are a bunch for download. 

Like what you see? Leave a comment to let me know!

Thursday, August 04, 2011

Flamingo card with Chomas Creations embossing kit for the Silhouette

I was sent some metal sheets from All that Jazz Supplies to try out with the Chomas Creations products, and let me tell you how awesome the metal sheets they have work with the Chomas Creations adjustable pen holder Silhouette Cameo with a stylus!  Well you can see that here hehe!  And they are heat activated, so no need for glue, you can just heat it up with your heat embossing gun, or an iron!  Super easy! 
Here is a card I made with MTC, you can download the flamingo design here... flamingo design for MTC  I also used the Chomas Creations adjustable pen holder and gel pens to make the circles on the card, and the Chomas Creations  adjustable pen holder and stylus to score my card!
For the inside of my card I used K Andrews stamp set Positive Thoughts and Quick Quotes paper and ink to stamp with.


Like what you see? Leave a comment to let me know!

Thursday, July 21, 2011

Tooth fairy layout with Chomas Creations embossing kit for the Silhouette

Ah those special moments in life, the loose teeth, the wiggling to get them to come out, the thrill of losing your first tooth... My poor Ella never got that as her big people teeth grew behind her baby teeth and never gave the the push they needed to come out!  In fact there were HUGE roots left on Ella's baby teeth!  But the tooth fairy still made in appearance, even though she didn't lose them in the traditional way hehe!
To make the tooth and heart border, I used Silhouette Studio to trace some images I found online.  You can download that file here... tooth border  I then added my metal sheet color side down to the embossing mat, and embossed it with the Chomas Creations embossing kit for the Silhouette.
The tooth fairy is a download from the Silhouette store so I can not share this file.  I did add the title to the image, then drew it with the Chomas Creations mini gel pen holder for the Silhouette.  I then colored it in with Copic markers, look no smearing!  I added a bit of Stickles to parts of my image for extra fun!
The journaling oval on this page was done with the Chomas Creations mini gel pen holder for the Silhouette.  I have that file to share here... file for oval journal
Here is the completed page!!  The papers, ribbon  and stickers (chosen by my Ella hehe!) are all Imaginesce. 


Like what you see? Leave a comment to let me know!

Tuesday, July 05, 2011

Graduation layout with Chomas Creations mini gel pen holder for the Silhouette

Ok, so I'm a bit behind on my scrapbooking... Being that my daughter is starting her senior year of high school in the fall, I figured it was time to get these pictures done hehe!

I used the Chomas Creations adjustable pen holder for the Silhouette to make the journaling ovals on this page.  You can download the Studio file here... journaling ovals 
The title was done with the Chomas Creations adjustble pen holder for the Silhouette with a stylus on Ten Seconds Studios metal sheets...
The papers & stickers I used for this page are all part of the Basic Grey Kioshi line. 


Like what you see? Leave a comment to let me know!