Easier shopping is here!

For those that wanted easier shopping, click on the shopping tab above or visit http://www.amychomas.com/

We are now taking credit card payments, or you can still use paypal! Any questions, you can send them to amyc222@yahoo.com

Want to learn how to use your new holders? Look to the right of my blog to see everything in categories!


Friday, December 11, 2020

Christmas tags with the Chomas Creations adjustable pen holder

I love making my own Christmas tags for a fun homemade feel when wrapping (or bagging hehe) my gifts.  I have used these tags in the past and you can find the file for them here... tags
I like to draw the design first which I used a Gelly Roll gel pen in the Chomas Creations adjustable pen holder for the Cameo 4 to draw.  You can also do this with any other Silhouette machine with the Chomas Creations adjustable pen holder for the Silhouette.
In order to draw first I send my image over to draw & turn off all the lines I don't want to draw by highlighting them and choosing no sketch.  Notice because I am drawing I select sketch, and then pen.  Now the "cuts" I need to make will not draw as they have been turned off.  Notice what I am drawing is a brighter thicker lined red, and anything not being sent right now is a thin line.
Next I'm going to select everything and set that to no sketch.  
Now I'm going to select cut, and I'm using the auto blade.  Now the items I want to cut I highlight & click the cut option.  Now the only thing being sent once again is the cut lines as you will notice they are thicker lined red.
And look at that a whole sheet of Christmas tags! 

I added some ribbon and will use double sided adhesive to add these to any present or I can just tie them on the handles of any gift bag I may have!  I think they add a fun personal touch!


Like what you see? Leave a comment to let me know! Thanks Amy Chomas

Wednesday, December 09, 2020

Chomas Creations engraving tip on a plastic craft mirror

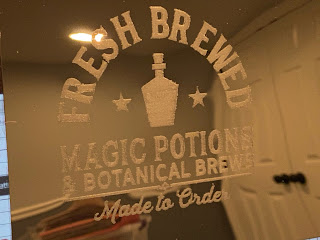
Just finishing switching to my Christmas decorations and needed a cute mirror to put up on one of my cabinets.  I used the Chomas Creations engraving tip on this plastic mirror I got at a local craft store.  
I did fill in the design that I got from Silhouette studio. You can see a tutorial for filling a design here.
I used a speed of 10 and a pressure of 30 with a multicut of 3.  I do like to use the engraving tip when I'm filling a design because it comes to a bit less of a sharp point then the precision tip and fills a design more.
Again I'm going to say how HARD it is to take a pic of a mirror!  LOL!
This will work in the entire line of Silhouette machines!  
You can find the engraver for the Cameo 4 here
You can find the engraver for the rest of the Chomas Creations machines here.


Like what you see? Leave a comment to let me know! Thanks Amy Chomas

Wednesday, November 18, 2020

Filling a design for engraving with the Chomas Creations engraving tip in Silhouette Studio

Filling a design is super easy with Silhouette Design Studio and I'm going to show you how.  This will work for Chomas Creations engraving tip as well as for use with the Chomas Creations pen and marker holders.  First choose the design you want to use and duplicate a copy.  I like to duplicate a copy (the grey looking one is my copy) so that I also have an outline of my design and not just the fill.  This file called give thanks is available in the Studio store.  Then go to line effects feature in Studio to fill the first image.  Notice I did change the spacing to put the lines closer together and changed the angle a bit.  
Next click on the transform feature and click on the diagonal arrow.  Choose scale by 300%.  This is going to help keep the lines close together for a better looking engrave.

Now go back to line effects and click on release effects.
Now go back to transform and click on 33%.  Notice it is back to the original size!  

Now you can line up your image along with the duplicate image and make them any size you want.  This will keep the lines close together for a great looking engrave!  


Here is my finished piece of acrylic, but this will work on engraving on metal blanks as well.  This is an LED base I got from Craft Chameleon.

You can find the Chomas Creations engraving tip for the Cameo 4 as well as some engraving blanks... here 
And you can find the Chomas Creations engraving tip for the rest of the Silhouette line as well as some engraving blanks... here


Thursday, October 22, 2020

Chomas Creations precision tip etching a plastic mirror

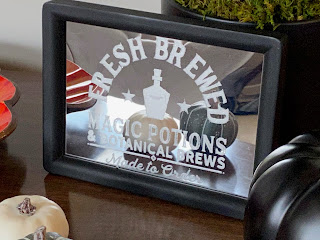
Halloween decorating fun with the Chomas Creations precision tip in the Cameo 4. This can be done in all Silhouette machines as well! 
I used the Cameo 4 with the Chomas Creations precision tip to engrave on this plastic mirror from Joanns.
I set the software to sketch, pen and the speed at 10 pressure 30 with a multi cut of 2.
Here's where you can find the Chomas Creations tools for the Cameo 4... here
And you can find Chomas Creations tools from the rest of the Silhouette machines... here


I did post a video on the Chomas Creations YouTube channel with how I set up the sketch fill.


Like what you see? Leave a comment to let me know! Thanks Amy Chomas

Wednesday, September 30, 2020

Acrylic LED birthday decoration with Chomas Creations precision tip

Birthday party decoration I made for this weekend! I used the Chomas Creations precision tip on acrylic to etch the design with my Silhouette machine. I used a pressure of 30, speed of 10 and multi cut of 3. The designs are sketches from the Silhouette store.
The acrylic piece and stand are from 143 vinyl.
You can find the precision tip for the Silhouette here...  http://amychomas.com/index.php?main_page=index&cPath=1_2
And the precision tip for the Cameo 4 here....  http://amychomas.com/index.php?main_page=index&cPath=1_18


Like what you see? Leave a comment to let me know! Thanks Amy Chomas

Monday, August 03, 2020

Chomas Creations precision tip in the Brother Scan N Cut

Fun with the Chomas Creations precision tip in the Brother Scan N Cut machine. I always say if it fits under the rollers in the machine I'm going to give it a try! I found these key chains on etsy. I do know how to spell I swear, this is the name of my boat. :) I did attach the key chains to the mat with double sided adhesive so they wouldn't slip around while engraving. I also sent them through the machine a few times to get this look.
Here's a video with the Chomas Creations precision tip in action!
Like what you see? Leave a comment to let me know! Thanks Amy Chomas

Tuesday, July 21, 2020

Grad party cards with Chomas Creations adjustable marker holder

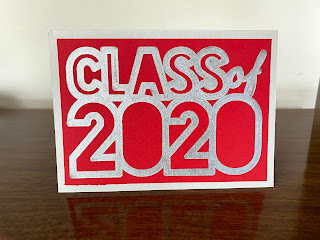
I love the way these grad cards turned out with the Chomas Creations adjustable marker holder and a silver metallic Sharpie.  I just chose the grads class colors and drew this out.  By using the sketch feature to fill in the design in the software you get this look!  Make sure you slow your speed and lower your pressure all the way to 1.  Otherwise you may crush the tip of the Sharpie!  
I did these in the Cameo 4 found here... Cameo 4 marker holder
but you can use and of the Silhouette machines with a Chomas Creations adjustable marker holder found here.... Chomas Creations


Like what you see? Leave a comment to let me know! Thanks Amy Chomas

Monday, May 25, 2020

Aluminum dogs tags with the Chomas Creations engraving tip

What amazing me the most about the Chomas Creations engravers is how very small you can make details and fonts. I used the Chomas Creations engraving tip on these aluminum dog tags with a speed of 5 and a pressure of 33 and a multi cut of 5. If you use double sided adhesive the tags won't wiggle on the mat when you are engraving.
A template is key when you try to engrave on anything. I measure the area I'm going to engrave on and for these I made a rectangle the size of the area where the names went and then cut that rectangle out of a scrap of paper. After that I apply the tag in the area when I am going to do the engraving and it lines up perfect every time. You can find the Chomas Creations engraving tips in my store here www.amychomas.com


Like what you see? Leave a comment to let me know! Thanks Amy Chomas

Friday, May 22, 2020

Cuff bracelets with the Chomas Creations precision tip in the Cameo 4

Want to know how I filled the font on these bracelets? I made a quick video you can see on YouTube here...
https://youtu.be/3bp2nltAB3MThe Cameo 4 tools from 
Of course this will work with all the Silhouette machines but I was using my new Cameo 4 to celebrate the face that the new Chomas Creations tools for the Cameo 4 are now shipping! You can order here... http://amychomas.com/index.php?main_page=index&cPath=1_18
I used the Chomas Creations engraving tip in the Cameo 4 to make these cuff bracelets from ImpressArts. I used a pressure of 33, a speed of 10 and a multicut of 2. I then darkened in the top bracelet with Sharpie and rubbed the excess off with rubbing alcohol.


Like what you see? Leave a comment to let me know! Thanks Amy Chomas

Tuesday, May 19, 2020


I found a bottle opener on etsy that was under 3 mm so I gave it a go for engraving in my Cameo 4 with the Chomas Creations precision tip. It was anodized aluminum and did take multiple passes to get through. I used a pressure of 33 and speed of 3. I think it turned out cute and plan on trying on more!
I did use double sided adhesive to secure it to the mat. I just added a video to the Chomas Creations YouTube channel to help see how I did it.
https://youtu.be/D0LMEvEsGoc
You can find the Chomas Creations tools in my store www.amychomas.com


Like what you see? Leave a comment to let me know! Thanks Amy Chomas

Monday, May 18, 2020

Cuff bracelets with the Chomas Creations precision tip in the Cameo 4


Playing around today with some copper blanks I got on etsy. They are the cuff bracelets so they are flat when they go into your machine and you bend them when they come out.  
I made sure to use double sided adhesive to stick them to my mat then engraved on them with the Chomas Creations precision tip.  This was in the Cameo 4 but there are also engraving tips for the entire line of Silhouette machines.   The design was from the Silhouette store. After I colored in the engraved design with Sharpie and used rubbing alcohol to get the extra off.  
I used a pressure of 30, speed of 3 and multi cut of 4.  
You can find the Chomas Creations engraving tips in my store www.amychomas.com


Like what you see? Leave a comment to let me know! Thanks Amy Chomas

Tuesday, April 14, 2020

Labels with the Chomas Creations adjustable marker holder


Organizing the pantry today and decided to make some labels for my containers using a fine point Sharpie in the Chomas Creations adjustable marker holder in the Cameo 4 to draw on vinyl from 651 Vinyl.
I drew the design first and then cut around the design for this look.
Make sure you slow the speed to 3 and lower the pressure to 1 when doing this as you can crush the tip of the Sharpie.
Ready to draw with your Cameo 4? You can find the Chomas Creations tools here... http://amychomas.com/index.php?main_page=index&cPath=1_18


Like what you see? Leave a comment to let me know! Thanks Amy Chomas

Monday, March 23, 2020

Chomas Creations engraving tip in the Explore!! Yes Explore machines!

Great news YES the Chomas Creations engraving tip for the Maker & Explore will work in the entire line of Explore machines!  And you can engrave with the Explore machine!  The key is to use double sided adhesive so your tag doesn't wiggle around and use the highest pressure and use a multi cut. I multi cut even 5 times to get a good look to my tags.  You can find the Chomas Creations engraver in my store here...  Explore tools
And right now using the coupon code getcrafty to save 10% off your order!


Like what you see? Leave a comment to let me know! Thanks Amy Chomas