Easier shopping is here!

For those that wanted easier shopping, click on the shopping tab above or visit http://www.amychomas.com/

We are now taking credit card payments, or you can still use paypal! Any questions, you can send them to amyc222@yahoo.com

Want to learn how to use your new holders? Look to the right of my blog to see everything in categories!


Wednesday, December 29, 2010

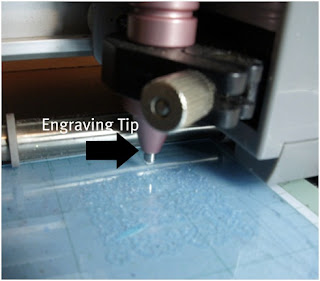
Snow much fun with the Chomas Creations engraving tip!

Well now, back to the season we are in!  The snow season in Michigan that is!  Of course snow and summer toys don't mix well...
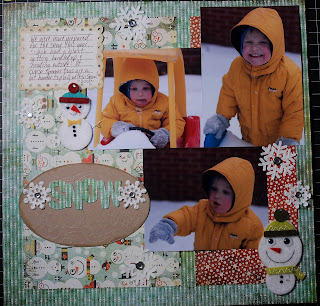
For this page I designed the title in Design Studio with Winter Frolic and used the Chomas Creations engraving tip on clear cardstock (like a clear, thin plastic sheet) to etch into the plastic. I etched the whole pattern into the clear cardstock, then cut the letters for "snow" to add to the layer. The etched clear cardstock shows up good on lighter color cardstock, but not so much on the darker ones, so I layered it on kraft cardstock that had the edges rubbed with ink to age them.

The journaling was from the stamps from SP & Company and I have a tutorial and download for that here... stamp download

I used Basic Grey papers and snowmen for this page and the snowflakes and brads are from Making Memories.  Here is my lil man out in the snow!
 
The Chomas Creations engraving tips are in stock and shipping!

Like what you see? Leave a comment to let me know!

Tuesday, December 28, 2010

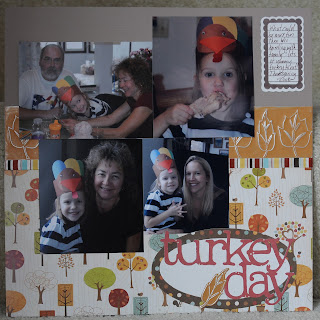
Turkey Day layout with Chomas Creations embossing kit

Ok, so I admit, this one has been sitting here for awhile!  I was at a crop and started it and realized I was missing some of the pics that needed to go on it, so I set it aside and forgot all about it lol! 
Samantha from Scrapmaster's Paradise  designed these SP & Company journaling stamps she sent me to play with, and I thought I would make up some Make-the-Cut files to use with them!  You can download the file for free here... stamps file  I simply cut a bunch of these shapes out with MTC and the Cricut, then used the SP & Company journaling stamps to make these journaling boxes!  I love having these kinds of things handy to pop on any page, so I made a bunch really quickly!


I used one on my turkey day page here...

You can see the stamp set here... Scallops and Lines Stamp Set
I also made a leaf border for this page using the Chomas Creations embossing kit on the Ten Seconds Studio metal sheets. 
To get this look, I put the colored side of the metal down, embossed on the 9x12 sheet, then sanded the debossed side to make it pop!  The best way to trim these metal sheets in a straight line is with a guillotine cutter, a nice straight line every time!  And it sharpens your blade to lol!

The papers are all Imaginesce, as well as the ribbon.  I did the title with Doodletype, and the leaves are from Stretch Your Imagination.


Like what you see? Leave a comment to let me know!

Thursday, December 23, 2010

Last Christmas project for the year with the Chomas Creations engraving tip!

Tomorrow is officially Christmas Eve, and I'm offically done with Christmas projects for the year!  I didn't get a lot of the things I wanted to get done, but this was a fun one!
I found these clear acrylic mini photo albums from Clear Scraps, and the cool news is they have more then just Christmas shapes!  I picked these up at Archivers.

They had snowmen, snowflakes, stars and Christmas trees and I saw them as the perfect ornaments after I used the Chomas Creations engraving tip on them to write the kids names!
But how to get them to fit right?  Well I traced the shapes on a piece of paper, scanned that in my computer, and then used Make-the-Cut to do an image trace of the images. 
Then I used the Chomas Creations mini gel pen holder in the Cricut to draw these images onto a sheet of paper, which I left in the machine.  I then added adhesive to the backs of my acrylic shapes (without removing the protective sheet that was on the backs of each piece), and then laid them on the piece of paper I used the Chomas Creations gel pen holder to draw on, so they were in the right spot. 
With MTC I added my names in each shape, then used the Chomas Creations engraving tip to etch into each plastic shape.  They were always in the right spot!
I simply finished with a piece of ribbon on each!  They look so pretty on the tree with the light shining through!  I made one for each of my nieces and nephews!


I hope all of you in blog land have a wonderful Christmas!!!  Take the time to be thankful for all those special people in your life and make sure you tell them how much you love them!  I'm so excited to be able to spend the holiday with my family!  I'll be back next week with more fun ideas!
Merry Christmas!

Like what you see? Leave a comment to let me know!

Tuesday, December 21, 2010

All 4 of my acrylic frames together!


Here are the 4 acrylic frames I have made all together!  They hang above my Ikea shelves on my dining room wall.  It is hard to get a good pic of acrylic because of the glare, so I have a few different shots! 

Like what you see? Leave a comment to let me know!

Monday, December 20, 2010

The last of 4 acrylic picture frames with the Chomas Creations engraving tip!

First I want to mention that everyone that pre-ordered a Chomas Creations engraving tip, they are on the way!  I mailed them USPS 1st class today, Monday!  Woohoo!  And they are now in stock and shipping for those that have been waiting.
Now for the last of my acrylic frames...  Now all 4 of my kids have their own frames for the wall!  I'm going to have to work on a pic of the 4 frames together, just no time today hehe.  To get this look I used Make-the-Cut and the Chomas Creations engraving tip on the Grafix clear plastic sheets.  Again, this is strong enough to stand up in a frame, so I add my pictures to the outside of the plastic, as well as the rhinestones! 


As you can see, my daughter is one of a kind, so I used the Once Upon A Princess title and butterfly to add to the front of the plastic as well. 

I have one happy 6 year old as she has been waiting for this day forever!  Well I think it was forever in 6 year old time, it doesn't seem like that long to me hehe!
Like what you see? Leave a comment to let me know!

Sunday, December 19, 2010

The Chomas Creations engraving tips are in stock and shipping!!!

Just letting everyone know that the Chomas Creations engraving tips are now in stock and shipping!  So everyone that pre-ordered, they are on their way to the post office on Monday December 20th and will be shipping USPS 1st class which is 2-4 business days, so they should be to all of you before Christmas!  Wheeewh!  I would love to see what everyone comes up with!  Please share!

Like what you see? Leave a comment to let me know!

Friday, December 17, 2010

On the go with the Chomas Creations embossing kit!

One thing is for certain in our house, our littlest boy has been on the go since the day he learned to roll around!  He is nonstop!  That is why the Boys will be boys cartridge works so well in my house hehe!  All of the titles on it are so fitting for him!  He is 4 now and still can't sit still!
The black background of this page is a graph paper I designed with George and Design Studio, there is a link for the file here... graph paper download  I used the Chomas Creations embossing tip on some of the Ten Seconds Studio metal sheets (color side down) to emboss the graph paper design, then sanded the surface to reveal the silver underneath!
The title and arrows are all cut out of Basic Grey's Oliver line with Boys will be boys.  I popped the arrows for added demension!


Like what you see? Leave a comment to let me know!
Thursday, December 16, 2010

Quick gift tags with the Chomas Creations mini gel pen holder!

I got some teacher gifts and realized I have no clue where the gift tags are, so I used the Chomas Creations mini gel pen holder with Make-the-Cut and the Doodlebats from Lettering Delights, to draw the presents,  then added a shadow to cut them out, and look, I ended up with a bunch of gift tags!  I used multi-cut 2 for with the glitter gel pens to make them really stand out on the white cardstock.

 
Like what you see? Leave a comment to let me know!

Tuesday, December 14, 2010

Day 3 of engraving with Maria and the Chomas Creations engraving tip!!!

Here we go with day 3!  Maria from Believe Dream Create has something amazing in store for you with complete directions which are listed below!  The Chomas Creations engraving tip is available for pre-order and will be shipping in time for Christmas!  As soon as they start shipping the pre-order price will go up, so get yours now!
Engraving with the Cricut—Necklace on Metal
I have been known to do some really crazy things with my Cricut. I love to try materials that you wouldn’t think would work…..well, here we go again, this one definitely worked!

As I was walking around my local Joann’s finding fun things I thought would work with the Engraving Tip I stumbled upon a pair of earrings…Yes Earrings in the Jewelry Department. Stay with me here….


The earrings were cheap! And….I got two, who would have guessed, LOL! I took off the “earring” hardware at the top of the circle. I then added some Scor-tape to the back of the earring to help hold it on the Cricut mat.


The image I chose is on one of the Creative Memories cartridges. It has a circle form to it. I used the Center Point feature on my Cricut. I moved the Blade Housing (aka—Engraving Tip) to the center of my earring and made my design 1½”. It fit perfectly!!

When you are done, you just have to wipe away the “dust” the engraving leaves. When I was done, I added some Silver Stickles to the center of the design.

I would say I can’t wait to wear this, but someone already took it from me as soon as it was done—actually the Stickles weren’t even dry yet!!!  (Amy here: That would be Maria's beautiful daugther!!!  Lucky Maria had 2 of the metal accents so she can make herself one to hehe!)
You have outdone yourself Maria!  Love this, and so does my daughter, which means I may be going to Joanns soon as well hehe!
Like what you see? Leave a comment to let me know!

Monday, December 13, 2010

Holy snow storm batman!!! Shipping info.

To celebrate my mom's 60th birthday the family all chipped in and took her for a weekend away at the Kalahari water park in Ohio!  There were 16 of us!  We were supposed to leave Sunday morn, but woke up to terrible weather, and news from the home front that the roads were even worse up by us!  So we got snowed in, which isn't so bad when you are at a fun water park hehe!  The plan was to leave early this morning (Monday), but after it took my hubby 45 minutes to clear off the mini van and get the doors unstuck, that was out of the question!  It was super windy driving, but the roads through Ohio and all the way to Detroit in Michigan were all clear, and we thought we were home free!  NOPE!  Detroit was an ice rink!  So many people were backwards against the rails, so many accidents, super scary driving (which my hubby did ultra safe and slow).  Most of the way home was like this, or with packed down snow where  you couldn't see the lines!  At least it was a clear day, as Sunday there was blowing winds at 50 MPH that would make for a nice white out that no one wants to drive in!  So we are home, safe and sound, but 3 hours after I wanted to be.  Which means I had no time to pack orders from the weekend, or get to the post office!  I'm soooo sorry!  I will be doing that tonight and everything will ship tomorrow!  Now to warm up!  Hope you all had a great weekend!

Like what you see? Leave a comment to let me know!

Sunday, December 12, 2010

Quick birthday card with Birthday Bash and the Chomas Creations mini gel pen holder!

My sweet niece is turning 8 this weekend, and being my sis forgot to tell me we were going to celebrate it (don't worry, I still love her!), I had to do a quick card for her!  And being she is my little scrapper, I headed to Archiver's to get her some goodies tonight, she is going to be soooo excited!  So here is her birthday card, I'm all about the funny punny's! I used the Chomas Creations mini gel pen holder with the pink glitter gel pen to draw "hoppy birthday" from the Birthday Bash cartridge.   The paper is all Basic Grey's Olivia line, and I used Stickles around the white cardstock as my niece loves the bling!


Like what you see? Leave a comment to let me know!

Saturday, December 11, 2010

Cute card by Kristal with the Chomas Creations mini Sharpie holder!

Kristal from K Andrew Designs has been featuring the Chomas Creations mini Sharpie and micro Sharpie holders this week, and if you head over and visit her, you can see some videos she has done with the Sharpie holders, and projects as well, and even better yet, you can enter to win a micro Sharpie holder that I sent her!  Here is a cute card where she drew the flourishes and snowflakes with the mini Sharpie holder, for more details and a video she has done, head to her blog... K Andrew Designs

Thanks Kristal!  Tooooo cute, glad you are having fun with them!

Like what you see? Leave a comment to let me know!
Friday, December 10, 2010

Day 2 of prepare to be WOWED by Maria with the Chomas Creations engraving tip!

Suprise!  Maria of Believe Dream Create is back with another AWESOME idea with the Chomas Creations engraving tip!  Scroll down a bit for Maria's directions for an engraved monogram necklace.  The Chomas Creations engraving tip is on pre-order for just $25, and will be shipping the end of next week!  This price is a pre-order special and will go up when they start shipping!
I'm also have a sale on my blog on all of the Chomas Creations products!  There is the "I want it all" sale where you get the Chomas Creations embossing kit, mini gel pen holder with all 20 mini gel pens, mini Sharpie holder, and micro Sharpie holder with a black micro Sharpie all for just $100 shipped in the US, this is a $120 value!  For those outside the US it is just $105!  Now onto Maria's instructions!

Need a gift for a girl friend? I have one! So, so happy with the way this came out!


I used Grafix Clear Plastic Craft sheets and the Engraving Tip.

It is hard to see the engraving due to the clear plastic. The blue you see is the thin backing, which I did not peel off to help it stay on the mat (a tip from Amy!). The top layer I that I am engraving on, I did peel off. I made the file in my Gypsy my welding the “M” right into the design.

When I was done with the engraving part, I changed back to my blade housing (without unloading the mat) and cut the square around the design that would fit right into my Inkssentials Memory Frames™. The size is 1¼ “ x 1¼”. I did a multi-cut of 6 on the Gypsy with my Blade Depth also at a 6. This cut just about all the way through.

I cut the rest of the way through with a craft knife. This is the finished design after the back covering was removed.
I then rubbed some Enamel Accents into the design with my fingers and quickly wiped away the excess. I also cut a piece of metallic red cardstock for the backing. I did try this originally with both acrylic paint and alcohol ink and I did not get the same results that I got with the Enamel Accents. (Amy here: love these crafty hands!!!  I often leave the house with my hands looking like this and wonder what people must think hehe!)
I then turned the piece over and filled in the “M” with a silver paint pen.
Next step—turn back to the front and add some Silver Stickles to the front of the “M”.
I then added some self-adhesive Bling and a ribbon. So fun!
Amy here:  Isn't this necklace absolutely amazing!  Maria always comes up with these fantastic ideas!  Wheeeewh!  Again Maria, thanks soooo much for this, it ROCKS!


Like what you see? Leave a comment to let me know!