Easier shopping is here!

For those that wanted easier shopping, click on the shopping tab above or visit http://www.amychomas.com/

We are now taking credit card payments, or you can still use paypal! Any questions, you can send them to amyc222@yahoo.com

Want to learn how to use your new holders? Look to the right of my blog to see everything in categories!


Showing posts with label Make-the-Cut. Show all posts

Friday, March 04, 2016

Magnetic boards with the Chomas Creations adjustable marker holder


When I found out that Sharpie made oil based markers that could write on glass and metal, I had to go get some!  I bought these magnetic scallop boards thinking I could make cute Christmas presents with them, but I wanted to give them a personal touch.  In came the Sharpie paint markers.  I added the white marker to the Chomas Creations adjustable marker holder in the Cameo to draw this design.  Being I wanted a true single line font, I used Make the Cut with the Lettering Delights thin font called Swirl. 
I used a speed of 1 and a thickness of 1 to draw the design.  Keep in mind this metal board is double sided, and I did play with different speeds and thicknesses, this is what worked best and didn't smear. I also suggest you keep your design on the mat until it dries.
As you can see in the picture I used some painters tape to add this metal board to my mat in each corner.  The board is stiff so I added something under the end hanging out of the machine to support the metal board.  I do need to figure out some fun magnets for this board.  If anyone has any ideas on where to get any strong ones, please let me know!


Like what you see? Leave a comment to let me know!

Monday, January 26, 2015

Magnet board with Chomas Creations adjustable marker holder

Well wouldn't you know it?  I made magnet boards for all of my nieces and totally forgot to take pictures of them!  I had to wait till after Christmas to post this so they wouldn't see their gifts, and then I totally forgot, and they are all handed out now (and they love them!)  I do still have my daughter's magnet board to share though.  And I added a special treat to the back of it!  Some chalk paint!
I did use Make-the-Cut to do these metal boards as it has an option for single line fonts and I wanted that with the Sharpie oil markers.  I used one in the Chomas Creations adjustable marker holder to draw Ella's name and the scrolls.  Both are from Lettering Delights thin fonts.  The name is Swirls and the flourish is dainty swirls.  I used a speed of 1 and a thickness of 1 to draw with the Sharpie marker.  I did tape my metal board to my Silhouette mat with painters tape.
Here is the front done!  The buttons are from My Friendship Bracelet maker, they are the My Image Button Maker.  I had my kids help with that part!
Here is Ella's name close up!  I love the oil based Sharpies for this as they stay on the metal!  I'm sure you could use dry erase markers on these boards for kids as well!  I just made this side to hang things on.
I also made a board for my son Jack.  His was big enough to fit under the rollers in the Silhouette so I didn't bother adding it to a mat, I just put it in the machine and wrote on it!  Again I used the Chomas Creations adjustable marker holder with a black oil based Sharpie.
Here is Jack's board all done!  More chalk board paint and more magnets!  Jack's is in a frame as the edges were sharp.  Boys and sharp don't mix! 
Want to try anything you have seen on my blog?  Use the coupon code jan15 to save 10% off your purchase in the Chomas Creations store!


Like what you see? Leave a comment to let me know!

Wednesday, May 08, 2013

Transformers birthday card with Chomas Creations adjustable marker holder

Today my son turned 7 (where has the time gone???) and I thought a Transformers birthday card would be perfect for him!  What says boy better then Transformers and silver?  I got this silver cardstock from Target 2 pieces for $1!  It is glossy so I used a full sized fine point Sharpie in the Chomas Creations adjustable marker holder.  I used a speed of 3, a thickness of 1 and double cut.
You can also cut through this silver cardstock with the Silhouette Cameo.  The design from this I made in MTC.

Don't forget to use the coupon code nsd10 to save 10% off your purchase in the Chomas Creations store!

Like what you see? Leave a comment to let me know!

Wednesday, August 08, 2012

Zebra card with Chomas Creations adjustable pen holder

Well it was time to experiment with the Zing again as I got some extra mats!  I added one of the Chomas Creations embossing mats to a Zing mat so I could work with some embossing!  My first experiment was on Core'dinations cardstock.  This cardstock has a color on one side and either black, brown or kraft on another.  So when you emboss on the white side of the one I chose, the black side is raised, and when you sand the white shows through.  I used a stylus in the Chomas Creations adjustable pen holder and set the force of the Zing to 160 and used a multi cut of 2.
When you sand the raised image this is what you get!  I have the zebra print for MTC for share here... zebra print

I added the thanks to the front of the card and it is done!


Like what you see? Leave a comment to let me know!

Sunday, July 29, 2012

Taylor with Chomas Creations adjustable marker holder

Look what made its way into my life this last week... It is a Zing!  Sandy of  I love KNK figured I needed one becaues she wants to see what I can do with it!  I have been playing with it with some of the Chomas Creations tools, and can I just say, WOW THAT IS SOME POWER!  First I tried it out on a metal 12x12 sheet I had big plans for with the Chomas Creations engraving tip, and this is what I got with it in the Zing!
I used these settings in the Zing:  force 160  speed 10 and multi-cut of 3-5 (didn't make enough of a difference to do 3, 4 or 5 so I will just stick with 3 next time)

Then I wanted to see what it would do on acrylic!  The settings are as listed.  The same meal sheet is behind the acrylic so that I could get a picture of it.
Of course I also had to test out the Chomas Creations adjustable marker holder!  I did try one of the Papermate Flair pens in the Zing without a holder and as you can see it just can't get a good grip on the marker, it could wobble back and forth.  I'm using Sandy' suggestion of the 25 post it notes in a stack to measure the height of the marker here.
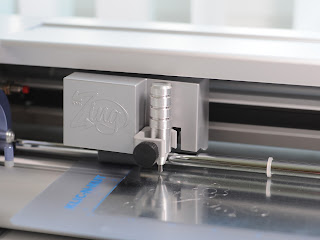
So I used the Chomas Creations adjustable marker holder in the Zing for more support and it left no room for wobble! 
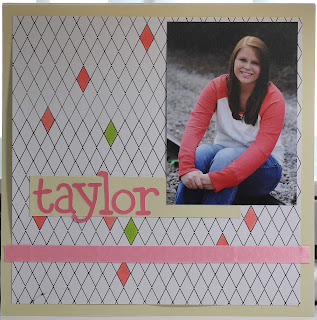
This is a harlequin pattern I made quite awhile ago for MTC.  You can get the file here...  harlequin background  I used the Chomas Creations adjustable marker holder with the Papermate Flair pen.  I used a force of 10 and a speed of 10 on the Zing.  After I drew the pattern I used the Copic markers in just a few of the diamond shapes to color them in.
The title was also cut with the Zing.  Smooth like butta!  (that is like butter hehe!)
I kept this page simple and just added some ribbon and a senior picture of my beautiful daughter!
There are so many different kinds of pens you can fit in the Chomas Creations adjustable pen holder for the Zing (this will center the pens in the holder).  Think glue pens and ball point pens and most gel pens, oh my!
Here is a Sakura Glaze gel pen in the Chomas Creations adjustable pen holder drawing with the Zing.


And if it doesn't fit in the adjustable pen holder there is always the Chomas Creations adjustable marker holder!  It holds up to 1/2 inch in diameter and will give all markers the support you need!
Here is the Chomas Creations adjustable marker holder with an ultra fine point Pilot Precise V5 (you can see how smooth it drew the design, and super thin to!)


Like what you see? Leave a comment to let me know!

Monday, July 02, 2012

4th of July with Chomas Creations adjustable pen holder

One of my fav holidays is the 4th of July!  Not just because of the cool fire works, but also because of how important this day is to our country!  And if I haven't stressed it enough our parts are all manufactured in the good old USA! 
I picked up these cute papers by Pebbles Inc and knew I needed some stars to go with it!  So I used the Chomas Creations adjustable pen holder for the Cameo with a stylus to emboss on a metal sheet.  After you add your mat with an embossing mat to the Cameo, you simply add the Chomas Creations adjustable pen holder in place of the blade, and use the popcycle stick that comes with every holder to adjust the height of the stylus.


This file for the stars is available for MTC here... star background.   I resized the file in MTC to make smaller stars.  By adding the metal sheet to my embossing mat color side down, after embossing I was able to sand the raised image. 

I used the font 2 peas airplanes to design the title in MTC as well.

I made the doodle journal circles using the Chomas Creations adjustable pen holder with a mini gel pen and the file from MTC that you can find here... doodle journal circles
Here is my completed page, along with some glittery ribbon! 


Like what you see? Leave a comment to let me know!

Monday, June 04, 2012

Thank you card with Chomas Creations adjustable marker holder

I have to work on some end of year thank you cards for the kids' teachers this year, and  here is one I came up with!  I was thinking the white gel pen would look like chalk on the chalk board (although they use smart boards at my kids' school!).  So I used the Chomas Creations adjustable marker holder for the Cameo with the Signo white gel pen to draw the Lettering Delights thin font called Teacher in MTC.  You can get the share for this file on here... abc thank you


Like what you see? Leave a comment to let me know!

Saturday, June 02, 2012

2012 card using Chomas Creations adjustable marker holder

If some of you read my facebook page you may know that I have a high school graduate this year! My oldest daugther graduated summa cum laude (which means she got a GPA of 3.8 or higher all of her 4 years in high school!) and that I am one proud mommy! And that explains the lack of blog play lately!
I will be going to a few grad parties this summer, so I got a start on some cards!  I made the inside sentiment, which is a Dr. Suess quote (I did put girl instead of guy in the quote).  I drew this inside the card using the Chomas Creations adjustable marker holder and a Sharpie liquid pencil.  I used MTC with thin font from Lettering Delights (these are single line fonts in MTC!  or they are thin fonts in Studio as they have a TTF version).  The font is called Eesome.  If you want the quote to use in MTC I have the download here... grad quote


The outside of the card is a share that Kay of Clever Someday has on her blog!  Hop on over there and thank her for the awesome share!   I cut this out using fuzzy vinyl so there is texture on the front of the card.


Like what you see? Leave a comment to let me know!

Monday, April 23, 2012

Thin fonts and the Chomas Creations adjustable holders

Thin fonts are here and I just had to play!!!  Lettering Delights now has a whole bunch of thin fonts and sketches to and you can find out more about them on Jin's Under a Cherry Tree!
I made this cute little design with LDT Funky & Farm Animals.  Here is how they look in Make-the-Cut, they are single line!!
I used the Chomas Creations adjustable marker holder with the Flair pens in the Silhouette Cameo to draw the design! 

Super quick but super cute!  And don't forget to use the coupon code april10 at checkout in the Chomas Creations store to save 10% off your entire order.


Like what you see? Leave a comment to let me know!

Saturday, March 03, 2012

Transformers birthday card with Chomas Creations embossing/scoring kit

So a couple of hours ago I found out my son was invited to a birthday party, he was given an invite to give to me, which I didn't get.  So the party is TODAY!  And I needed a quick card!
Can you even believe I made this card in less then 15 minutes??  Maybe even 10...  Sssssh don't tell!
I used the Chomas Creations embossing/scoring kit in the Cricut to score the side of the card for easier folding, and to emboss the Transformers design on a metal sheet.  I had made this file in Make-the-Cut awhile ago for another birthday card, so this one was super easy!
Now I have to run and get a quick shower as I'm off to roller skating!  Wish me luck!  I'm sure it will be amusing!!


Like what you see? Leave a comment to let me know!

Tuesday, February 07, 2012

Little Animal with Chomas Creations embossing kit

Now this is one of my fav things to do!  It does take awhile, so you have to be patient, but the results are soooo cool!  It is embossing these intricate designs with the Cricut!  I traced this Animal image in Make-the-Cut and then used the Chomas Creations embossing kit in my Cricut to emboss the image on a metal sheet.  Then I sanded the raised image.  How cool is that???


The title was welded together in MTC using the font LD Blankie.


The journaling circles were made with the Chomas Creations mini gel pen holder in the Cricut.  You can see a video on how to make them and download the file here... journaling circles


Here is the completed page, along with my favorite little Animal! 


Like what you see? Leave a comment to let me know!