Easier shopping is here!

For those that wanted easier shopping, click on the shopping tab above or visit http://www.amychomas.com/

We are now taking credit card payments, or you can still use paypal! Any questions, you can send them to amyc222@yahoo.com

Want to learn how to use your new holders? Look to the right of my blog to see everything in categories!


Tuesday, September 03, 2013

Back to school sign with Chomas Creations adjustable pen holder

One last back to school sign as my daughter that is in her 2nd year of college just asked me "where is mine?"  So here is Taylor's sign!
I saw these gel pens that are Target's generic brand, up & up in action on some of the facebook pages, so I had to give them a try.  These are in the pen section at Target, I found them on the bottom shelf.  There are 24 gel pens here and they cost me just $10.49!  Not a bad deal at all!  And some of the colors work great on black!  Very exciting!  These all fit in the Chomas Creations adjustable pen holder.
I used a speed of 4 and a thickness of 10 to write with these.  There was some skipping, but that is easy to fix!  Just don't remove your project from the Cameo and draw it again.  The lines will draw right over!  You can increase the thickness and slow down your speed for better results. 
These fonts are all from Da font.  Listing from top to bottom...
KG Second Chance
Sketch Serif
Denne Threedee
Sketch Serif


Like what you see? Leave a comment to let me know!

Friday, August 30, 2013

The biggest difference between the adjustable pen and adjustable marker holder...

I get asked this question A LOT!  The biggest difference between the Chomas Creations adjustable pen and adjustable marker holder is of course the size.  The adjustable pen holder is 3/8 inch in diameter and the adjustable marker holder is 1/2 inch diameter.  But what does this mean when using gel pens in the adjustable marker holder?  Well you are going to get what they call an offset (meaning the gel pen is NOT centered in the holder).  Now this means that if you want to draw an image, when you go to cut it it isn't going to be centered when you try to cut your shadow.  The adjustable pen holder is very close to center with most gel pens (Chomas Creations mini gel pens, Sakura, Gelly Roll, and more).  So when you go to cut your shadow with these gel pens, it is going to line up right for you.  If you go to put these same sized gel pens into the adjustable marker holder, you will notice you have to tighten the screw quite a bit, making it even further off center. 
Here is a card I made using the Chomas Creations adjustable pen holder for the Cricut with a Chomas Creations black mini gel pen (if you own the Expression 2, you can use any length gel pen!)  Notice how the shadow cut around the design very nicely!  If you want to try to make this card with Once Upon A Princess in Cricut Craft Room, I have the file here... birthday party
Oh and notice how far my cupcake pops off the page?  That is an Action Wobble Spring!  How neat is that?  I'm going to make my cards more fun with these hehe! 


Like what you see? Leave a comment to let me know!

Tuesday, August 27, 2013

Back to school layout with Chomas Creations adjustable pen holder


Back to school is fast approaching, let the countdown begin!  Just 1 week from today I will be sending my kids back and getting a lot more done every day!  lol
I take more pictures then I will ever be able to scrapbook, that is just something I am learning to live with, so these are the kids going back to school 2 years ago!  The year in a new school that we woke up late and I forgot to do anything with my poor son's hair!  lol  But such is life!
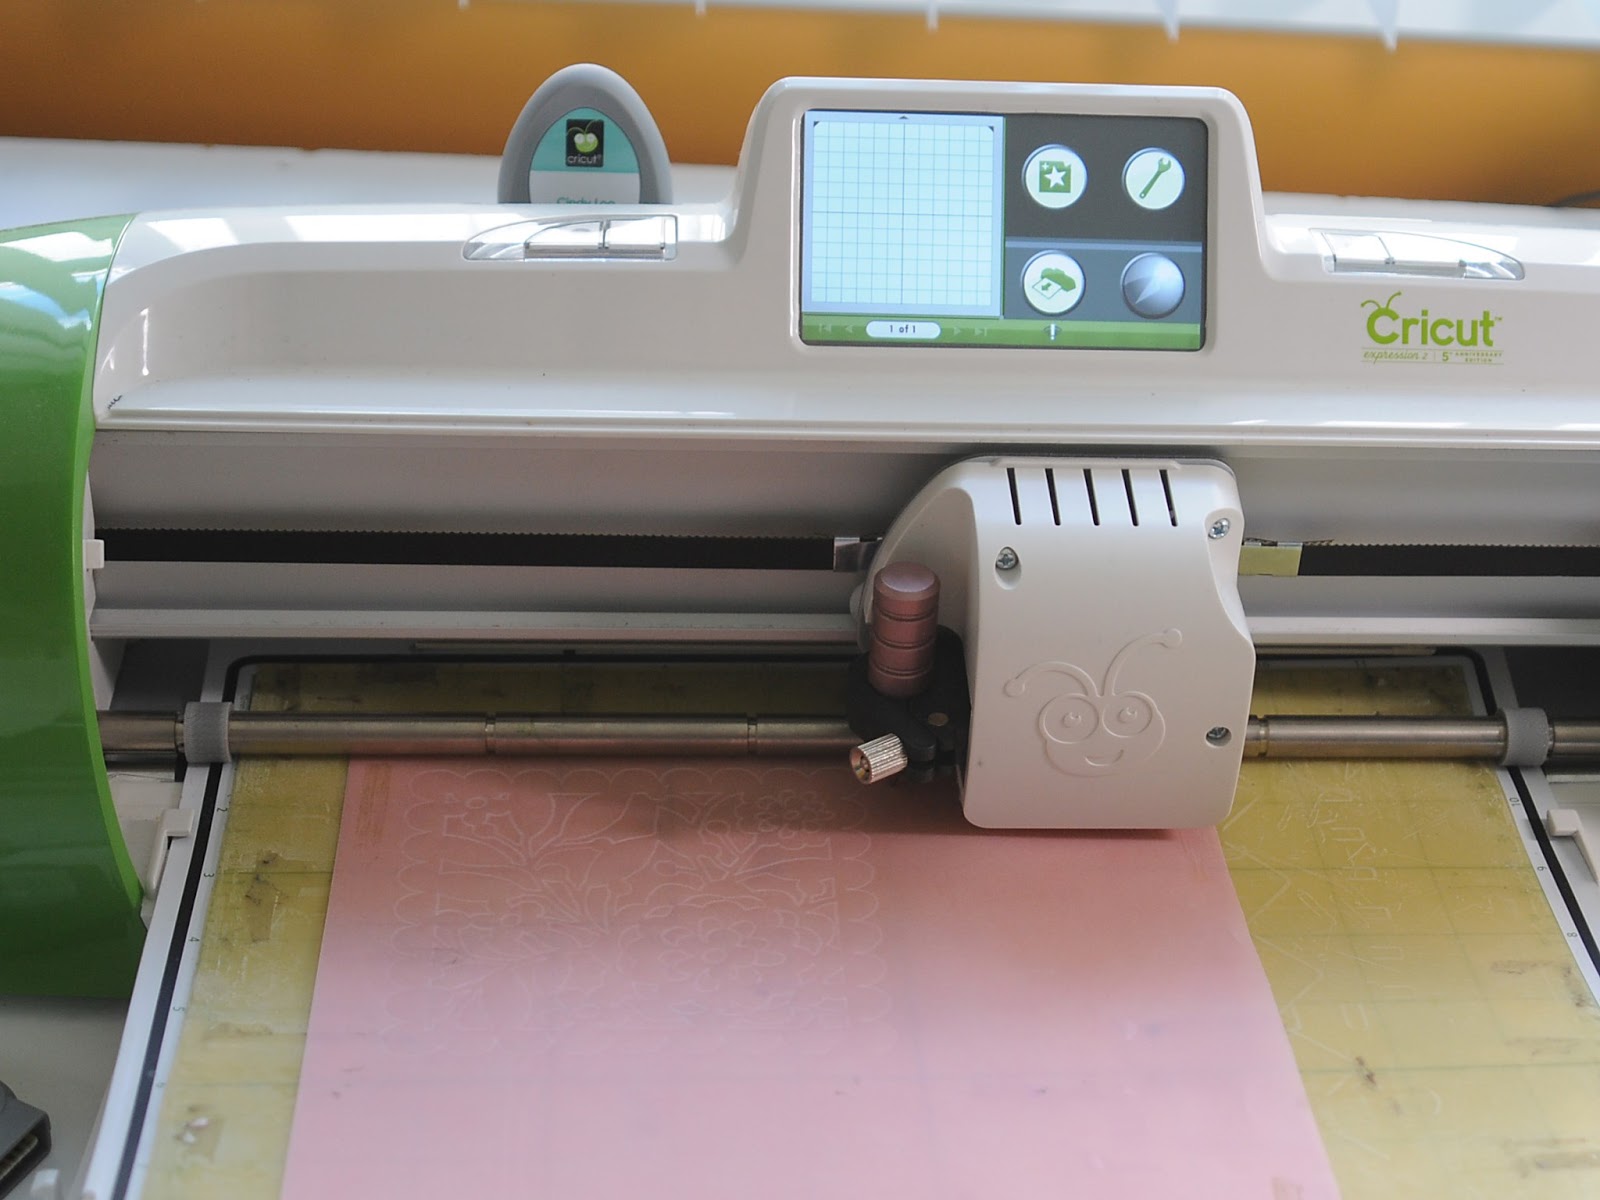
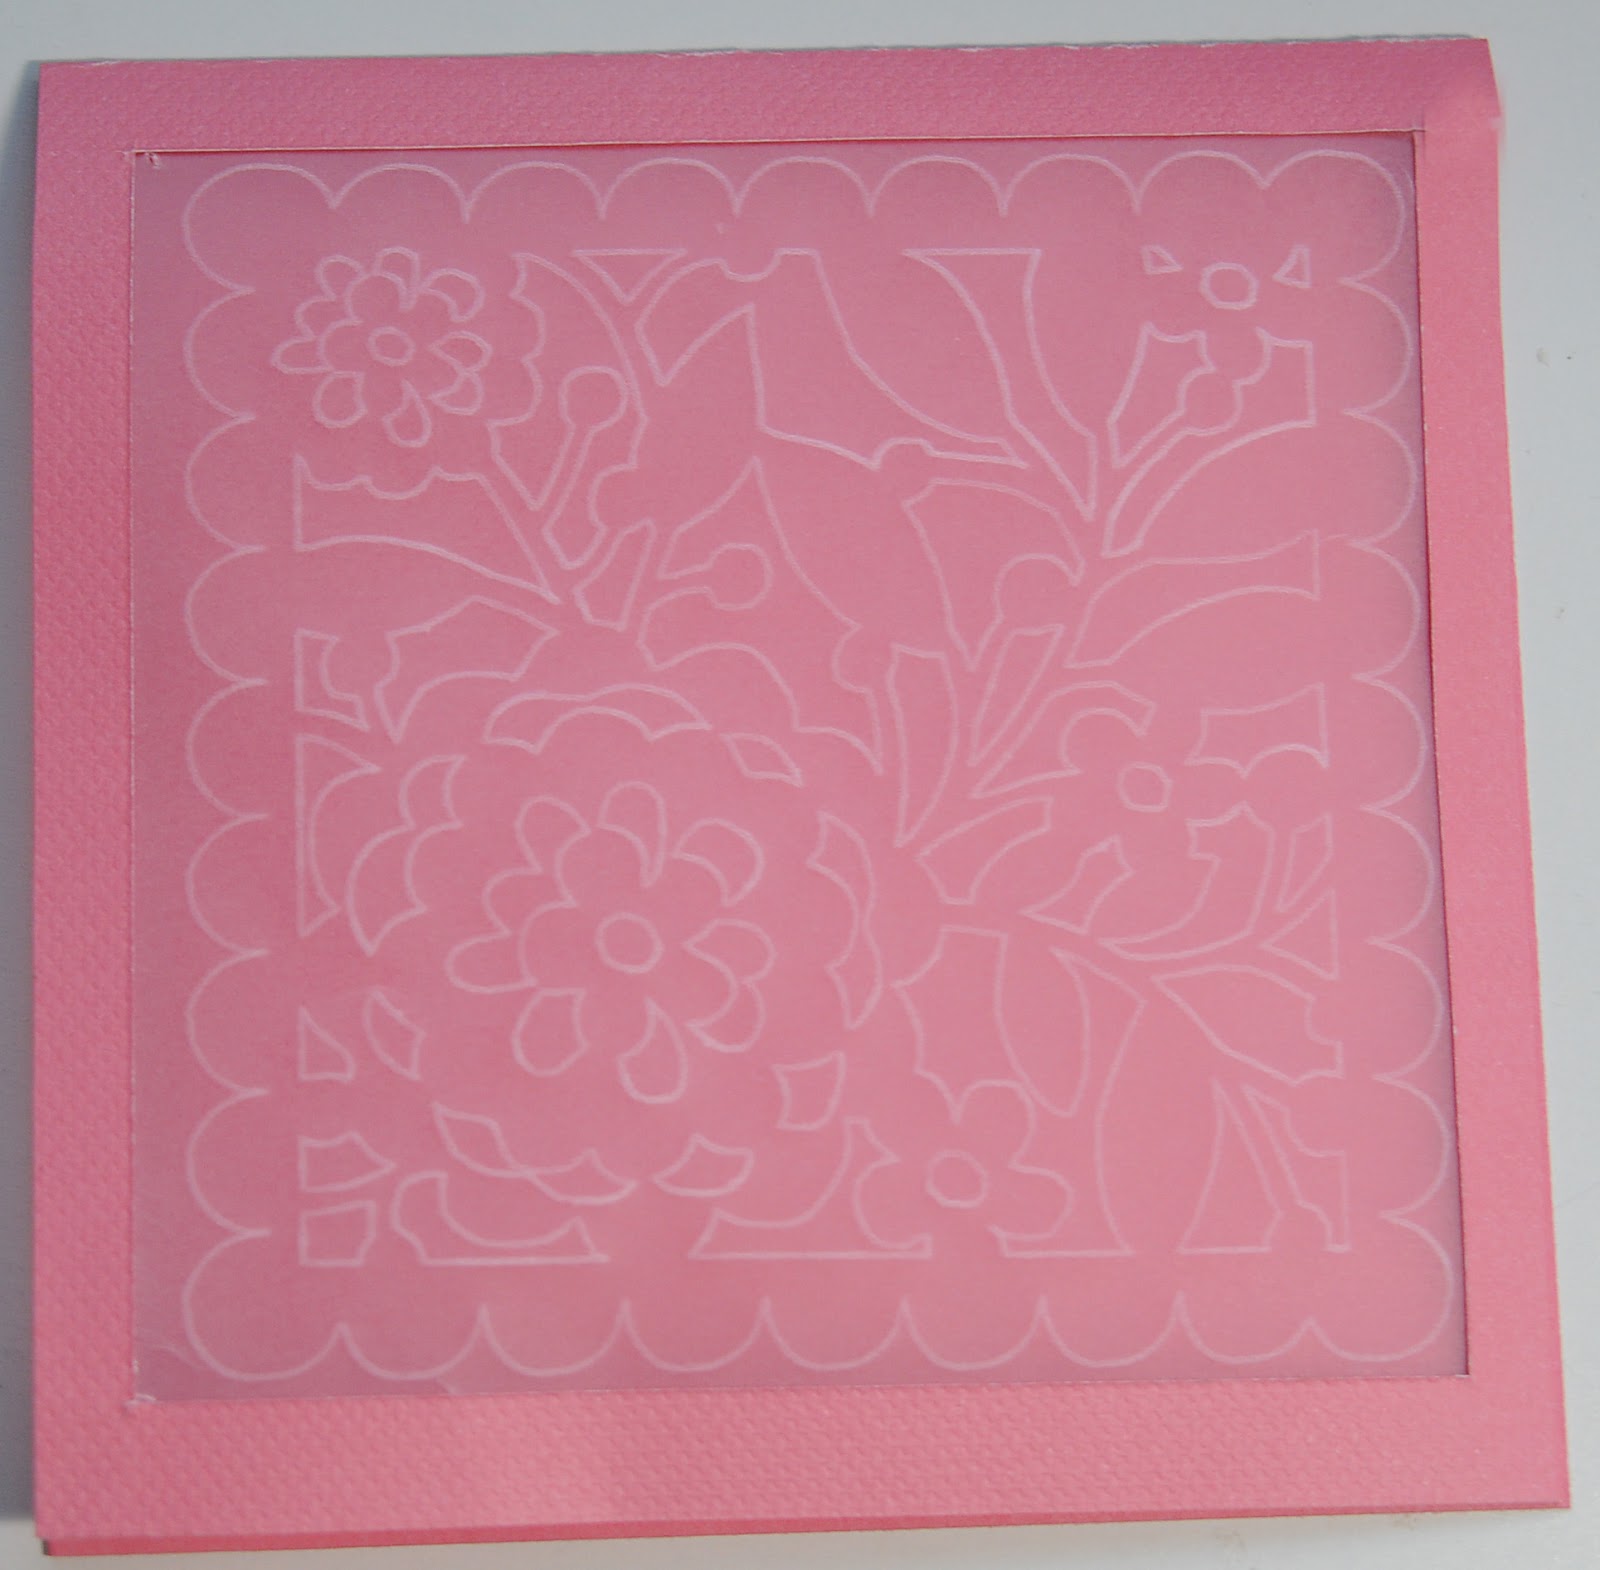
I used a white Gelly Roll gel pen in the Chomas Creations adjustable pen holder to draw the title and white border around the layout.  I used a speed of 5 and a thickness of 4. 
Here is a hint for when you are drawing with your Chomas Creations holder.  Make sure your whole image draws before you unload the mat from the machine.  The "b" in back to school didn't draw the first time around, so I increased my thickness, decreased my speed, and voila, you can now see the "b".  I would have had to start over if I hadn't checked my work first!
The title is from the Silhouette Studio store. 
The journaling oval is one I keep on hand.  I make a bunch of these at a time with the Chomas Creations adjustable pen holder and a gel pen of my choosing.  The file for the journaling oval is a share here... journaling oval
Here is the completed layout.  I added some old chipboard letters I have on hand (use up that stash!) and ribbon as well. 
Want to try drawing with your Silhouette machine??  Use the code august13 to save 10% off your purchase in the Chomas Creations store to get you started!


Like what you see? Leave a comment to let me know!

Friday, August 16, 2013

Chalkboard look with Chomas Creations adjustable pen holder


Ok I do have plans with this project, but I was so excited how these Soufflle gel pens by Sakura show up on the black cardstock and kind of gave that chalkboard feel, that I had to just share!  That and this fun blog called I should be mopping the floor (shouldn't we all?  lol) shared these awesome fonts that would be fun to draw, and even engrave, she calls them chalkboard fonts.  There is a long list (25!) of these chalkboard fonts here... I should be mopping the floor
Here are just 3 of the fonts I chose to try out.  I used the Souffle gel pens in the Chomas Creations adjustable pen holder in the Cameo to draw these.  This is just normal black cardstock.  Because these gel pens are very juicy, I do slow my speed down to about 3-4 to do this.  And they do take a couple of minutes to dry, so let the project sit on the mat until dry so as not to smear (live and learn!)


Like what you see? Leave a comment to let me know!

Tuesday, August 06, 2013

Bee happy card with Chomas Creations adjustable pen holder

Looking for a white gel pen that will center in the Chomas Creations adjustable  pen holder, well here you go... The Gelly Roll by Sakura.  I did try it on kraft cardstock and it didn't show up well enough, but it did look good on the black.  So the darker color cardstock does work best.
The slower speed worked better with this gel pen, so I did do this on a 1 speed with a thickness of 5.  As you can see in the picture the gel pen is centered in the Chomas Creations adjustable pen holder, so that it lined up just right on my edges of my card!  Bee happy is one of Lettering Delights thin fonts.  The bee and flower are a download from the Silhouette Studio store.  The loop de loop around the outside of the card was done with the Studio sketch feature.
Want to try this out for yourself?  Use the coupon code august13 in the Chomas Creations store to save 10% off your purchase!


Like what you see? Leave a comment to let me know!

Monday, August 05, 2013

Back to school with Chomas Creations mini Sharpie holder

It is that time of year again!  Time for my favorite commercial... It's the most wonderful time of the year, they're going back... back to school!  Where the dad is dancing down the aisles... hehe  They should really use a mom in that commercial! 

Being I have 4 kids that go to school each year, I get a bit behind on these back to school layouts!  So this is from last year, my daughter on her way to kindergarten.  You can get the Design Studio file for this page here... back to school
I used the Chomas Creations mini Sharpie holder to do the border and accents on this page on cork board.  Yes corkboard!!  There are so many surfaces out there that the mini Sharpies will write on that normal markers just can't handle!  This corkboard is by Quickutz.  They are 4x12 self adhesive sheets.
I used the Chomas Creations mini gel pen holder to make my own lined paper!  I used the file here for the horizontal lines, that I usually use for my journaling circles....  journaling circles  I drew all the lines in the Chomas Creations light blue glitter mini gel pen.
The back to school file has the vertical lines, I used the Chomas Creations red glitter mini gel pen for these.
This also made for some easy journaling on the page!
I designed the title with a shadow and cut it out of red and green paper.  The title is also on the back to school download.
Here is the completed layout!  The ribbon is Imaginesce.  And of course the patterned paper was made by me hehe!


Like what you see? Leave a comment to let me know!

Wednesday, July 24, 2013

Fabric markers in the Chomas Creations adjustable marker holder

So I was out shopping at Staples and found these...

Yes they are Sharpie markers, and they are made for fabric!  I thought, why not try drawing with them in the Silhouette?  So I did!  They fit in the Chomas Creations adjustable marker holder.   You have to make sure you are using a sticky mat so the fabric doesn't move or bunch up.  The directions say they are machine washable on cold, and you should hang dry. 

I drew this flower and then colored it in with different colored Sharpie Stained markers.  I left my fabric on my mat for coloring, it was easier and didn't move on me.


 I had to play around with my settings.  The faster speeds left a thinner line (think 4 or 5, not too fast) while the slower speeds left a thicker line (1,2,3).  This was just me playing around!  I used a thickness of just 1.  Don't want to much pressure, these are brush tip markers.
The top 2 fonts on the left are some thin fonts from Lettering Delights. 

Want to try this out with your Silhouette machine?  Use the coupon code july13 at checkout in the Chomas Creations store to save 10% off your purchase!


Like what you see? Leave a comment to let me know!

Tuesday, July 23, 2013

Embossed card with Cricut Expression 2

Here is a quick card I did today with the Chomas Creations embossing kit for the Cricut and vellum!  The design I used is one from Cindy Loo. 
I attached the Chomas Creations embossing mat to my Cricut mat (you don't even need a new one, just clean an old mat, add some adhesive, I use Zig 2 way glue, and add your mat to that!)  Then I attached a piece of vellum with adhesive in each cover to the embossing mat.  I set my pressure to 5, or max, the speed to 3 or medium and embossed the design.  I did use a multi cut of 2.
 I added the Chomas Creations embossing tip into the Expression 2 (it fits in the entire line of Cricut machines though!) and tightened the screw.  No other parts needed, the embossing tip fits right into the machine.

I did cut out a window in my card for the vellum to sit in.  I just used my paper trimmer for this as I said I was going for quick! 

 
Want the same look using the Cameo?   Use a stylus in the Chomas Creations adjustable pen holder and use an embossing mat.

***Don't forget to use the coupon code july13 in the Chomas Creations store to save 10% off your purchase at checkout!
Like what you see? Leave a comment to let me know!

Wednesday, July 03, 2013

Sweet with Chomas Creations adjustable pen holder

Lucky me!  My niece Addi made me my very own scrapbook!  We decided we needed more pictures of the 2 of us together and how could I not document how very touched I was?
I used the Chomas Creations adjustable pen holder with a Staedtler triplus pen to do the journaling.  I used a thickness of 3 and a speed of 5 to draw the journaling.  The font is from Lettering Delights and is called Giddy.  It is one of the thin fonts that I love for journaling as it looks single lined even though it isn't!  Notice how I did my journaling right on my 12x12 layout!  No need for a big printer for me!
I do love the look of white on white for a subtle look (especially with my crazy color journaling!) so I did the title in that.  This is a Studio download by House of 3 called sweet.
Here is my finished page along with my sweet niece!!
Don't forget to use the coupon code june13 at checkout in the Chomas Creations store to save 10% off your purchase!


Like what you see? Leave a comment to let me know!

Tuesday, July 02, 2013

He's all boy with Chomas Creations adjustable marker holder


If there is one thing that comes to mind when I think of my youngest boy, it is that he is all boy!  Dirt, trouble, and chaos seem to find him!  But of course he has a sweet side to, as you can see by that smile!
I used the Chomas Creations adjustable marker holder with a white Signo Uniball gel pen to draw the graph background paper.  I love graph paper as it helps line everything up!  Like your title, or photos or patterned paper.  You can get the graph paper file for Studio here... graph paper 
Being the Signo white gel pen is a juicy pen I like to slow down my speed to 2 and use my thickness low, 2, so that it doesn't smear.
The title on this page is a Studio download.
Here is the completed page!  I will admit to liking goodies that match a paper line as it is a super easy way to dress up a page.  So yes I do get them sometimes to add a little fun to a page.


Like what you see? Leave a comment to let me know!

Thursday, June 27, 2013

Barnyard Moosical with Chomas Creations adjustable marker holder


More cute sketches in the Studio store means more cute layouts for me lol!  The cow was a sketch file from Studio, the title was done in Lettering Delights thin font called Giddy.  Jin did a post on her blog alerting me that Giddy is a FREE download from Lettering Delights, you can get the info here... Under a Cherry Tree 
While thin fonts don't show up as single line fonts in Studio, they are pretty darned close!  The bigger you make the font the more you can tell that it is double lined.  I drew the title and journaling lines with the Chomas Creations adjustable marker holder and a Copic Multiliner .5 mm tip.  I changed my lines in Studio using the line style feature so I could have dashed lines. 


I also added some music notes as it was for a Moooosical after all!  The dots I made were using a Viva Décor pearl pen.  The dots even look poofed when dry! 
Don't forget to use the coupon code june13 at checkout in the Chomas Creations store to save 10% off your order!


Like what you see? Leave a comment to let me know!

Saturday, June 15, 2013

Father's Day card with Chomas Creations engraving tip

Oh boy, I almost (I did say almost, right) feel guilty because this card was soooo easy to make!  The title is from the Studio store.  The kraft cardstock is made for cards and pre-scored.  All I did was use the Chomas Creations engraving tip in the Cameo with a speed of 3, a thickness of 33, and double cut to etch the sentiment in the card.  Then I swiped a Tim Holtz distress ink over the top of it!  I've been sooo busy lately (I know excuses, excuses) and had just a few minutes to get this done!  I think it gives a pretty neat look as the ink absorbs into the etched cardstock and is darker then the rest of the card!


Don't forget to use the coupon code june2013 to save 10% off your purchase in the Chomas Creations store!


Like what you see? Leave a comment to let me know!

Monday, June 10, 2013

3 ring circus with Chomas Creations adjustable pen holder

Ah the story of my life!  With 4 kids and 3 dogs it is often a 3 ring circus in my house.  My mom was watching us try to load our mini van one night, trying to get the kids in, dogs get out and are running around the mini van, we are chasing dogs, telling the kids to get their seat belts on, and in her car my mom is just cracking up telling me she can hear the circus music playing.  It is funny, it is hard, but I wouldn't have it any other way! 
I had to find a circus font for this page, so I googled circus fonts and came up with this one.  I used the Chomas Creations adjustable pen holder with a Staedtler pen to draw the title.  Doesn't it look amazing???  Doesn't look like it was drawn by the Cameo!  You can get the file for the title here... 3 ring circus
I also used the Chomas Creations adjustable pen holder to draw the journaling lines in the circle.  The share for the journaling circle is right here on my blog... journaling circle

And here are all the members of my 3 ring circus!  I also added some ribbon and canvas stickers to the page for some fun extras!  The rings were also cut with the Silhouette Cameo!


Like what you see? Leave a comment to let me know!

Wednesday, June 05, 2013

Birthday card with the Chomas Creations adjustable pen holder and some free fonts!

So I see these doodle fonts that I like from someone else, then realize there is a whole bunch more by the same person!  So if you are looking for some dingbats and cute fonts (some are thin and would work great for journaling), look no further then MTF fonts!
I used the MTF Cupcake font for this card, as well as the MTF Sweetdings for the actual cupcake.  Did I mention both are FREE fonts!  And look how cute!  I drew them both with the Chomas Creations adjustable pen holder and the Staedtler triplus fineliner (one of my fav pens!).  I used a thickness of 4 and a speed of 5 for the drawing.
 Notice how the font looks like a thin font or single line font.  This will work at smaller sizes for these fonts, but the bigger you get the font will look outlined.


Like what you see? Leave a comment to let me know!