Easier shopping is here!

For those that wanted easier shopping, click on the shopping tab above or visit http://www.amychomas.com/

We are now taking credit card payments, or you can still use paypal! Any questions, you can send them to amyc222@yahoo.com

Want to learn how to use your new holders? Look to the right of my blog to see everything in categories!


Thursday, September 27, 2012

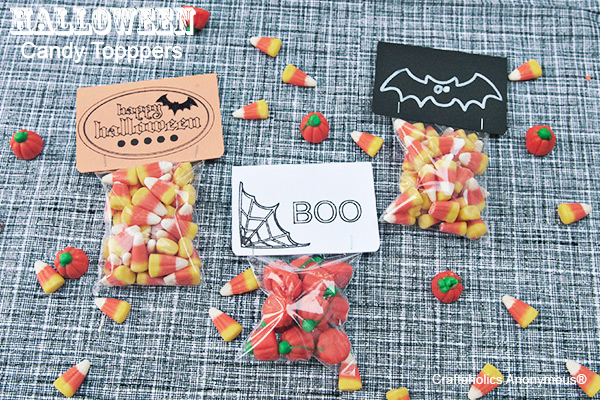
Halloween treat toppers and the Chomas Creations adjustable marker holder


Woohoo!  My Chomas Creations adjustable holders are being featured this week on Crafaholics Anonymous!  Linda made some Halloween treat toppers with the Chomas Creations adjustable marker holder.  You can get more details on her blog here... Craftaholics Anonymous

Thanks Linda!  Those turned out super cute!  There is a few suprises on her blog as well!  Just sayin...

Like what you see? Leave a comment to let me know!

Friday, September 21, 2012

Halloween layout with Chomas Creations engraving tip

I just love when others give me ideas to try out, and this one was a lot of fun!  Of course next time I would probably choose a simpler pattern as this weeding took quite a long time! 
This is the Core'dinations Black Magic cardstock.  The front side is black, the back side is orange, and they have a bunch of different colors with the black.  When you etch into the black with the Chomas Creations engraving tip, the orange shows through.  I used the pressure at 33, the speed at 4, and a double cut.  Now you have seen me do that before, but someone gave me the idea to use a paper piercing tool to weed out the pieces of black to see the orange behind!  Like I said this was a lot of work, and I would probably choose a simpler pattern next time, but I do love how it came out!  I did get some longer pieces to come out of the design though.


The title is from the Studio software.  I did cut it 3 times and layered it, then added some Stickles for bling!


The journaling is on one of my thought bubbles, made using the Chomas Creations adjustable pen holder and a gel pen.  You can get that download and more details here...  thought bubbles


And here is my little girl all dressed up! I actually made the rhinestone shirt with a Studio download and Silhouette rhinestones!  I so love all that I can do with the Cameo!  And yes my sweet little doggie is dressed up as a little devil!  She may look all sweet on the outside, but she is a bit of a stinker!


Like what you see? Leave a comment to let me know!

Tuesday, September 18, 2012

Update on metal clay and Chomas Creations engraving tip


If you remember seeing this amazing ring I posted on Saturday by Wanaree and you missed out on watching how she used the Chomas Creations engraving tip in the Cameo to make it, now is your chance!  The Craftcast is up with details by Wanaree on youtube here...  metal clay  It is at the end of part 1 and beginning of part 2.  Thanks again Wanaree, I just love that ring!


Like what you see? Leave a comment to let me know!

Saturday, September 08, 2012

Metal clay & the Chomas Creations engraving tip

This is a very exciting post for me!  I got a few messages on facebook from the group MCSILies about women using the Chomas Creations engraving tip in the Cameo with metal clay to make jewerly.  I was just amazed at what is being done!  This post is by Wanaree from A Work in Progress.  Read to the end to find out how you can learn more about this process, and be prepared to be amazed!

Metal clay is a malleable form of metal that can be formed much like ceramic clay, but once it's fired it's completely 100%, solid metal, with all the qualities that come with that metal. Before it's fired, it's soft enough to sculpt, impress textures into, and wonderful to engrave. The texture plates, or hard sided stamps was created from an original design drafted on the Silhouette designer software, then cut and engraved using the Chomas Creations engraving tip.
  Those stamps were pressed into two flat slabs of the Sterling clay and allowed to air dry until it reached a leather hard state. The clay was run thought the Silhouette, and the Tibetan "OM" symbol was engraved into the ring's front panel, and "om mani padme hum" engraved into the ring back. The silver clay was then fired to 1500F and cooled. Now it's completely solid sterling silver! The ring was hammered into shape and then soldered together, with the engravings facing in.


**Want to hear more? On September 12th, 8PM EST, you can join in for the free, live, online event "More I Love Tools" through www.CRAFTCAST.com. Craftcast specializes in providing, online, project oriented workshops, featuring some of the top names in their craft fields. During the event you'll hear more about this process, get the chance to win some great giveaway prizes, and receive discount codes for some of the fabulous tools that will be featured. Don't miss out! Sign up here: http://t.co/KzhUqFhH

**The videos of the Craftcast are now up on youtube for you to watch here... metal clay ring  The ring is shown at the end of part 1 and beginning of part 2 in the video list.
 
Thanks so much Wanaree for sharing your talent with us all! 
Like what you see? Leave a comment to let me know!

Tuesday, September 04, 2012

Flower card with Chomas Creations engraving tip


There are a bunch of awesome sketches for download in the Silhouette Studio store which of course work great with the Chomas Creations adjustable holders.  But I thought to myself, wonder how these sketches would work with the Chomas Creations engraving tip in the Cameo.  See for yourself!  I used the pressure on 33, speed on 4 and double cut.  This was with Core'dinations kraft core cardstock.

Like what you see? Leave a comment to let me know!

Monday, August 27, 2012

Big girl bike with Chomas Creations engraving tip

Another proud mommy moment right here!  The taking off of the training wheels!  And look at her go (on her little bro's bike!)
I used the Chomas Creations engraving tip on Core'dinations kraft core cardstock to etch the little bike design (a Studio download).  Then I added my title on top.


The engraving thought bubble is one that I designed and you can download that and see more information here!  thought bubble  I used the Chomas Creations adjustable pen holder with a gel pen to draw the journaling lines.


Here is the completed page along with my little girl on the big girl bike! 
Don't forget to use the coupon code 10august to save 10% off your entire purchase in the Chomas Creation's store! 

Like what you see? Leave a comment to let me know!
Sunday, August 26, 2012

Lettering Delights Simple Shapes and the Chomas Creations holders!

Lettering Delights has done it again!  They now have what they call Simple Shapes, and it is a huge set of shapes you can cut out, but the best part?  They also have a bonus layer that you can draw with the Chomas Creations holders!  Jin of Under a Cherry Tree has more info on her blog, as well as a special Lettering Delights is running on these shapes!  I'm hoping I get to play tomorrow, but in case I don't I wanted everyone to see this special before it ends!
Also don't forget to use the coupon code 10august at checkout to save 10% off your entire purchase in the Chomas Creations store!


Like what you see? Leave a comment to let me know!

Wednesday, August 22, 2012

First day of School with Chomas Creations adjustable pen holder

Aaah the count down has started!  In just 12 days my kids will be back to school and I will have more free time then I know what to do with (ok, not true, but wouldn't that be amazing??  Think of all the crafting we could get done hehe!). 
This is my kids' starting at a new school last year.  Pay no attention to the fact that I forgot to brush my son's hair! 
I used the Chomas Creations adjustable pen holder in the Cameo to draw the line background on this page.  I used a Chomas Creations light blue glitter mini gel pen with a speed of 7 and a pressure of 3.

The title, apple, scissors and pencil are all Studio downloads that I added to the page.
Here is the completed layout!  Pretty quick and simple, but I like it!


Like what you see? Leave a comment to let me know!

Friday, August 17, 2012

Birthday card with Chomas Creations adjustable marker holder

I made this simple card for my niece's birthday.  I used the Chomas Creations adjustable marker holder with a Uniball Signo white gel pen (my fav!!) to draw the hearts on kraft cardstock with the Cameo.  The happy birthday sentiment is a Studio download. 


Like what you see? Leave a comment to let me know!

Thursday, August 16, 2012

Birthday wishes with Chomas Creations adjustable pen holder

One of my favorite things to do with the Chomas Creations holders is to make my own journaling goodies!  Circles are always my fav!  You can make these journaling circles with Cricut Craft Room and the Chomas Creations adjustable pen holders!  Get the download using George for these here... journaling circles
I used the Chomas Creations adjustable pen holder with a Sakura Glaze gel pen to draw the lines for these.
 

Without removing your mat from the machine, take out your pen holder and add the blade.  Now cut your circles!
I just love using these for journaling so my writing is all lined up!
Here is the right side of my layout!  You can see the left side of this layout using the Chomas Creations adjustable marker holder and a Copic Multi Liner to draw the title and color with Copics here...  left side

Don't forget to use the coupon code 10august at checkout in the Chomas Creations store to save 10% off your entire purchase!


Like what you see? Leave a comment to let me know!

Wednesday, August 15, 2012

Birthday wishes with Chomas Creations adjustable marker holder


This is the first side of a 2 page layout I am working on!  Tomorrow I will have a share for Cricut Craft Room! 
I used the Chomas Creations adjustable marker holder with a Copic Multi-liner (these are made by Copic to go with the Copic markers and they won't smear!) in the Cricut Expression 2.  As you can see height is no problem in the E2! 
After I drew my title from Birthday Bash I used Copic markers to color it in!  Just think of all your own stamps you could make to color!  (As you can see I need some work on my coloring skills hehe!)

Here is the finished page! The papers and canvas stickers are all Imaginesce. 


Like what you see? Leave a comment to let me know!

Monday, August 13, 2012

hahaha with Chomas Creations adjustable pen holder


My youngest daughter found these awesome sunglasses for a steal at a garage sale (just $.25!)  She was so proud of her find we had to tell Gramma, hehe!  I wanted this page to be a lot of fun to go with the pictures, and what is more fun then embossing???
I used the Chomas Creations adjustable pen holder with a stylus in the Cameo to emboss these patterns on metal sheets.  By having the metal sheets face color side down, then embossing, you can sand the raised image to get this look.


I used the Chomas Creations adjustable pen holder with a Sharpie no bleed pen to draw the journaling lines in the bubbles.  These were a recent share for Studio that you can find here, along with directions...  journaling bubbles
The title is from the Silhouette Studio store.
Here is the completed page!  I cut a bunch of circles in Studio to add to the background along with my embossed metal circles.


Like what you see? Leave a comment to let me know!

Wednesday, August 08, 2012

Zebra card with Chomas Creations adjustable pen holder

Well it was time to experiment with the Zing again as I got some extra mats!  I added one of the Chomas Creations embossing mats to a Zing mat so I could work with some embossing!  My first experiment was on Core'dinations cardstock.  This cardstock has a color on one side and either black, brown or kraft on another.  So when you emboss on the white side of the one I chose, the black side is raised, and when you sand the white shows through.  I used a stylus in the Chomas Creations adjustable pen holder and set the force of the Zing to 160 and used a multi cut of 2.
When you sand the raised image this is what you get!  I have the zebra print for MTC for share here... zebra print

I added the thanks to the front of the card and it is done!


Like what you see? Leave a comment to let me know!